
Specifications


©2004 Maytag Services 16023430 Rev. 0 11
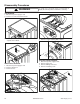
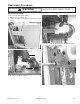
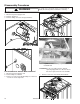
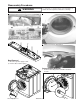
Troubleshooting Procedures
!
WARNING
To avoid risk of electrical shock, personal injury or death, disconnect power to unit before servicing, unless testing
requires power.
Place washer into Service Mode and check for diagnostic codes. See Technical Data Sheet behind Toe
Panel.
Will Not Start
•
Plug cord into live electrical outlet. Check for proper
voltage.
•
Check fuse or reset circuit breaker.
•
Push the START/PAUSE button to start the clothes
washer.
•
Close door and push the START/PAUSE button to
start the clothes washer. START/PAUSE LED should
change from flashing to on continuously.
• Check to see if the washer in a pause or soak period
in the cycle. Wait briefly and it may start.
•
Check for restricted drain system.
• Check the line filter connection terminals for good
connections.
•
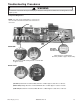
Check the Machine Control Board terminal
connections. See Technical Sheet or Mini Manual
packed inside washer.
•
Check for stuck buttons on Console, pushing in on
board tact switches. Readjust buttons on inside of
Console.
•
Replace Console Control Board
.
Leaking
• Make sure inlet hose connections are not leaking.
Check for rubber gasket damage due to over-
tightening.
•
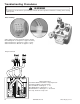
Check standpipe for leak. Wrap a dry rag around the
standpipe opening. If rag becomes wet, leak is fault
of home plumbing. Be sure the standpipe is capable
of accepting the flow of water from the washer.
•
Make sure end of drain hose is correctly inserted and
secured to drain standpipe.
•
Check internal hose connections (fill, drain systems,
dispenser hoses & clamps).
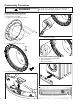
• Check rubber boot. Remove, reposition and reinstall,
if necessary.
• Check for possible kinked dispenser to outer tub
hose. Hot water pressurization may force door open.
No Tumble
•
Start normal cycle with an empty machine and allow
a fill to check tumble.
•
Fabric cycles such as NORMAL, DELICATES,
HAND WASH, & WRINKLE CONTROL only tumble
periodically, every 60 seconds.
• Washer does not tumble during most fills or during
presoak.
•
Perform
Board Output Test
. See Technical Sheet
or Mini Manual packed behind Toe Panel.
•
Check for loose connections at Machine Control
Board, Pressure Switch, Motor, Tach Harness and
Motor Control.
• Check motor windings resistance. (Connector CN1
Pins 8 & 9 = 3.6 ohms, pins 1 & 10 = 1.1 ohms, Pins
5 & 10 = 1.1 ohms)
•
Check belt.
•
Washer with heat option does not tumble while
heating. (Export washers only)
Will Not Spin
•
Check to make sure the door is fully closed.
•
Check for water left inside the washer. If present,
see
Will Not Drain
.
•
Perform
Board Output Test
. See Technical Sheet
or Mini Manual packed behind Toe Panel. Will
washer spin? Possible unbalanced load scenario
previously.
•
Check for loose connections at Machine Control
Board, Pressure Switch, Motor, Tach Harness and
Motor Control.
• Check belt.
No Water Fill
•
Test water fill. Perform
Board Output Test
. See
Technical Sheet or Mini Manual packed behind Toe
Panel.
•
Check to make sure water supply is turned on fully.
•
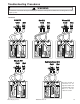
With no clothes in washer normal water level is
between the 4
th
and 5
th
hole on the spinner back wall.
•
Check electrical circuit and connections at the Water
Valve, and Pressure Switch.
•
Check for kinks in inlet hoses.
•
Check for clogged inlet screens.
•
Visually check hot and cold separately for fill.
•
Check for low water pressure. May be dependent on
pressure entering home. Variations may occur due
to usage in the home at the time machine is used.
•
Check for frozen pipes and hoses.
•
Check resistance of water valve coils. (Normal 1.18K
ohms; CN3 connector – Cold (BU) – Bleach (OR) –
Hot (RD) and the White wire pin 1 on main.
• Check for loose connections at the Pressure Switch
or on the Machine Control Board, connector 5P.
Tub Full of Suds
•
Check for restricted drain system. See
Will Not
Drain
and
Will Not Spin.
•
Check for loose wire connections at Control Board
and Drain Pump.
•
Perform
Board Output Test
. See Technical Sheet
or Mini Manual packed behind Toe Panel.
•
Use high efficiency or low sudsing detergent
specially formulated for front load washers.
• Reduce detergent amount for that specific load size
and soil level. Towel loads have a minimal amount of
soil present and typically create more suds.
•
Check to see if belt is off motor and pulley.
•
Run the clothes washer through another complete
cycle using the coldest water, tablespoon of salt and
no detergent.
Wet Clothes
•
Very small clothes loads can cause unbalanced
loads. Add additional towels.
• Excessive suds may have been present, due to not
using High-efficiency detergent. Reduce amount of
detergent usage.
•
See
Will Not Spin
.
• Low Spin Speed was selected.
Will Not Lock
•
Door not all the way closed or not properly aligned.
Possible laundry load is too large to close door.
•
Place washer into
Service Mode
and check for
diagnostic codes 4 &18. See Technical Sheet or Mini