DYN-6206-01 2 Person Sauna OWNER’S MANUAL FOR CARBON MODEL SAUNAS FOR INDOOR USE ONLY 120VAC 15 AMP DEDICATED CIRCUIT Sauna: Now you can enjoy the European secret for youthful vitality. Carefully and thoroughly read this manual before using the sauna. We recommend keeping this manual for regular review and future reference.
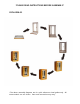
*PLEASE READ INSTRUCTIONS BEFORE ASSEMBLY* DYN-6206-01 *The above assembly diagrams are for quick reference visual guides only. All sauna models are not shown. Parts and accessories may vary.
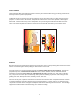
WHAT ARE INFRARED RAYS? Infrared is the band of light we perceive as heat. We cannot see this band of light with the naked eye, but we can feel this type of light in the form of heat. Our sun produces most of its energy output in the infrared segment of the spectrum. Infrared rays heat your body without having to heat the air in-between. This process is called conversion. The infrared is divided into 3 segments by wavelengths measured in microns: near infrared: 0.76-1.5 microns; middle infrared: 1.5-5.
HOW IT WORKS Infrared Saunas differ from traditional saunas in that they use infrared radiant energy to directly penetrate into the body's tissue to produce perspiration. Traditional saunas use steam to heat the air inside the sauna, which then heats your body until you begin to perspire. In order for this to be effective, temperatures would need to reach in the upwards of 190 degrees Fahrenheit. Infrared saunas only need a temperature of up to 120 degrees Fahrenheit to obtain the same effect.
Benefits include, but are not limited to: - Pain relief from Rheumatoid Arthritis - Relaxing muscle spasms - Increasing blood circulation - Cardiovascular conditioning - Clears rashes, acne - Reduces cellulite - Removes toxins and mineral waste - Reduces stress and fatigue - Enhances skin tone SAUNA MAINTENANCE Since infrared saunas do not require hot rocks, water, or steam to operate, they require very little maintenance. You can simply wipe it down with water and a soft clean cloth.
TABLE OF CONTENTS Product Introduction 4 Parts Description 5 Assembly Instructions 9 Operating the Sauna 15 Tips for Using Your Sauna 19 Safety Instructions 19 Safeguards for Your Sauna 20 Troubleshooting Guide 21 Warranty 23 Warranty Card 25 WARNING: Visually inspect all heaters before assembly to make sure they are not damaged. Any excessive vibrations during transport could cause damage to the heating elements.
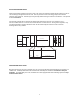
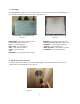
PARTS DESCRIPTION Figure 1 NOTE: The pictures and diagrams shown above are for representational purposes only. Actual model may vary.
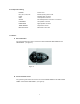
I. Power Supply The POWER SUPPLY BOX is the control center of the sauna room. It is installed on the ROOF PANEL and has input/outputs connected to it as seen below. (see Figure 2 & 3) Power Supply 1 (Control Panel 1.2) Power Supply 2 (Control Panel 1.
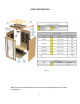
III. Component Labeling POWER HT1, HT2, HT3, HT4 LIGHT CTRL CD/SIG L/SPEAKER R/SPEAKER TEMP SENSOR MP3 AUX INPUT Power Cord Emitter (heater) power cords Reading lamp connector Control panel connector For CD/temperature sensor/etc. connectors Left speaker connector Right speaker connector Temperature sensor MP3 /radio connection IV. Buckles A. External Buckles The external buckles are used to connect the LEFT and RIGHT SIDE PANELS to the REAR PANEL. (see figure 5) Figure 5 B.
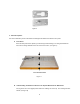
Figure 6 V. Panel Descriptions For easier installation, please understand and distinguish the differences between each panel. A. Floor Panel When the floor panel faces upward, you will find (2) raised moldings, one along what will be the front and one along what will be the rear of the sauna room. (see figure 7) Front Of Sauna Room Figure 7 B. Understanding The Difference Between The Top And Bottom Of The Wall Panels The (4) panels are in the upright position when the moldings are at the top.
Figure 8 C. Rear Panel The rear panel is the panel with the buckles. The buckles are mounted on the outside of the rear panel. (see figure 9) Figure 9 D. Understanding The Difference Between The Inside And Outside Of The Rear Panel You will find the heat emitters on the inside of the rear panel. Assembly Instructions A. Choose a good location to install the sauna 1. The location must be dry, leveled, and away from any source of water 2. MAIN POWER cord must be easily accessible 3.
4. Wood cabin installation order: Floor Panel Front Panel Right Side Panel Left Side Panel Rear Panel Bench Emitter Panel Bench Roof Panel Roof Cover 5. B. Installing the FLOOR PANEL 1. C. Tools Required: Philips Screwdriver and Ladder Place the FLOOR PANEL on the floor. Some models have wood braces that must be installed on the underside of the FLOOR PANEL. Please check to see if such wood braces were packed in the box containing the FLOOR PANEL.
Figure 11 E. Installing the BENCH HEAT EMITTER PANEL and BENCH 1. Installing the BENCH HEAT EMITTER PANEL can be a little tricky. You will need to slide the BENCH HEAT EMITTER PANEL into place at an angle as indicated in the pictures below. (see Figure 12) 2. Plug in the BENCH HEAT EMITTER connector to the corresponding inlet located on the SIDE WALL PANEL. Also plug in the FLOOR HEAT EMITTER PANEL. (see Figure 13) connector to the corresponding inlet on the REAR WALL or SIDE WALL PANEL. 3.
Figure 13 F. Figure 14 Installing the ROOF PANEL 1. The side with the power supply box faces upward. 2. The edge nearest the power supply is the front of the ROOF PANEL. Be careful of the wires coming from the REAR PANEL when you set the ROOF PANEL down onto the panels. Feed the wires through the holes in the ROOF PANEL. Do the same for any wiring harnesses coming from the SIDE or FRONT PANELS. 3. Be careful not to force the ROOF PANEL into place.
G. Connecting the plugs on the ROOF PANEL 1. Connect the plugs according to the respective labels. (see figure 16 – 18) 2. Connect the CTRL plug from the power supply to the CTRL plug from the control panel. Then screw together. 3. Connect the buzzer connection.
(Models with Bluetooth) H. Installing the TEMPERATURE SENSOR 1. Enter the sauna and remove the protective covering from the TEMPERATURE SENSOR. Situate the TEMPERATURE SENSOR so that it is vertical, pointing downward.
Note: Some sauna models are shipped with a spare TEMPERATURE SENSOR in case the TEMPERATURE SENSOR is damaged in transit. The manufacturer decides this according to sauna models and packaging. I. Putting on the ROOF COVER 1. Place the ROOF COVER over the top of the sauna. Be cautious when pulling the power cord through the hole in the roof cover. Gently place the ROOF COVER onto the ROOF PANEL. When the edges are aligned, screw the ROOF COVER to the roof panel. (see figure 21) Figure 21 J.
necessarily the air inside the sauna. It is not a hot box like a traditional sauna. The temperature gauge is a guide for your safety. It is recommended that you drink water before, during, and after sauna use to prevent dehydration since body fluids will be lost through perspiration. It is not recommended to shower after use since the pores in your skin will be open and could possibly absorb anything in the water. Control Panel (1.
6. When the temperature is at the set-up value, the digital control will maintain the set temperature. The emitters will stop generating heat. Once the inside temperature drops approximately 4 degrees, the heat will again be generated by the emitters. The inside temperature will always remain around the set-up value. 7. Reading lamps and/or roof lamps and/or color therapy lamps are operated by pressing the button located on the control panel.
1. Plug the sauna into the outlet receptacle. 2. Press the button once. The POWER light will come on, the TIME DISPLAY will show 90 (minutes), the TEMPERATURE DISPLAY will show 66 (degrees Celsius), and the control panel will flash. 3. Press the button and then the up/down arrows to adjust the amount of time you want the sauna to remain on. Press the C/F button to choose between Celsius and Fahrenheit. Press the button and then the up/down arrows to adjust the temperature setting.
9. Bluetooth can be used on the sauna room. You first will need to pair your device with the sauna room. Open your device’s Settings Menu and then locate and open Bluetooth. You will find iSauna or BT100 or Bluetooth. Now you can pair your device. Once pairing is successful, your device will be connected. Please note that you must unpair/disconnect from Bluetooth if your sauna model has the optional MP3 Jack at the ceiling and you choose to use the Aux Wire to connect to the speaker system.
Excessive temperature has a high potential for causing fetal damage during pregnancy. 6.) Hyperthermia Danger: the normal body temperature can't rise above 39°C (103°F). Symptoms of excessive hyperthermia include dizziness, lethargy, drowsiness, and fainting. The effects of excessive hyperthermia may include failure to perceive heat, physical inability to exit sauna, unawareness of impending hazard, unconsciousness and fetal damage in pregnant women.
5. Unauthorized substitutes may result in fire, electric shock, or other hazardous conditions. After any repairs, please ask the service technician to perform safety checks to determine that your sauna is working properly. Do not use any wall receptacle adapter or extension cord between the sauna cord and wall receptacle. Troubleshooting Guide 1.
as all the heater cord connections. Attempt to turn the sauna on at the control panel. Contact the manufacturer for any additional troubleshooting. Solution: There could be damage to the temperature sensor. If your sauna arrived with a spare temperature sensor, turn the control panel off and go to the roof of the sauna and locate the red and black wire near the air vent towards the rear of the sauna. After you have located the red and black wires labeled “TEMP SENSOR”, disconnect them.
Limited Lifetime Warranty 5 Year Limited Warranty: Golden Designs, Inc. warranties the wood, structure, heating elements, and electronics against defects in material and workmanship for a period of 1 to 5 years from the original date of purchase. This sauna is for INDOOR use only. Placing your sauna outdoors will VOID this warranty. Any damage due to exposure to outdoor elements such as rain, snow, sun, wind or extreme temperatures will not be covered by this warranty.
Page Intentionally Left Blank 24
WARRANTY CARD Congratulations on your purchase of an Infrared Sauna from Golden Designs, Inc. Please take the time to complete the following Warranty Card and mail it back to: Golden Designs, Inc. 3550 Jurupa Street, Unit B Ontario, CA 91761 Please include a copy of your sales receipt showing date of purchase as this will serve as proof of purchase. Warranty will be VOID if the following warranty card is not mailed back within 60 days of purchase date along with proof of purchase.