
Radio User Manual

MAXX-2400HD Owner’s Manual Page 93
Managing Disk Arrays
The Image Server’s Disk Array Configuration Utility provides tools for monitoring and
managing the disk array. Monitoring and troubleshooting programs automatically check the array,
report problems and provide access to RAID status information and service options.
If up to two drive faults should occur, it should not cause data loss; but remember that the
drive array is degraded and no longer has fault tolerance. Hence, another disk failure will cause a
complete loss of data and system failure. After a drive failure it is strongly recommended that at
the earliest time diagnostics be performed.
Error Notification and Repair
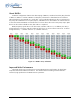
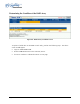
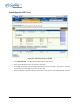
The server will notify users in the event of a fault by flashing the front panel DRIVES light. A
failure condition will also be indicated in the Image Server GUI in the status bar, on the bottom of
the screen and highlighted in yellow ( Figure 38 ). A GPIO Output can be programmed to activate
upon a RAID or system fault. This can be used to activate a warning lamp or alarm. Refer to Page
65 for more information on programming GPIO events. A drive fault can be trigged by a variety of
conditions. The first step in response to an error warning is to open the RAID CHECK STATUS
window from the On-Screen Start Menu. Click Start > RAID Status to launch the RAID Array
Configuration Utility.
Figure 38 - GUI Drive Fault Indication
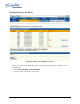
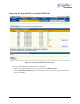
The RAID Maintenance window (Figure 41) displays the current status of the RAID controller
and all disks connected to the RAID system. On inspection, you will find the array in one of the
following states:
• OK, indicated by "OK" for Array Unit 0 and all Ports (drives);
• Initializing, indicated by "Initializing" on the Array Unit 0 status line;
• Degraded, indicated by "Degraded" on the Array Unit 0 status line;
• Verifying, indicated by "Verifying x%" on the Array Unit 0 status line.
• Rebuilding, indicated by "Rebuilding x%" on the Array Unit 0 status line.