
Installation Guide


7
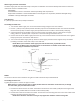
3 All horizontal runs of drain lines must have a fall of ¼” per foot (6.35mm per 30.5cm). An air gap will likely be
required between the ice maker drain hose and the drain/waste receptacle. A stand pipe with a trap below it
would be acceptable for the drain/waste receptacle. A oor drain is also acceptable.
4. Pour 1 gallon of water into the ice storage bin to check for leaks at all drain connecons and at the nut of the
drain water hole. Tighten any connecons or nuts that leak.
IMPORTANT: This ice maker is not a freezer. Hot temperatures will cause a high rate of melng in the ice
storage bin. Ice will drain over me. A drain is required.
INSTALLATION TYPES
This ice maker has been designed for Mobile (free-standing) installaon. However, it can also be Enclosed (under a
cabinet) or Built-in (sealed to the oor). In every case, there must be adequate air space around the unit for venlaon.
Mobile Installaon
A mobile installaon will allow you to install the ice maker free-standing in any place you desire provided you have access
to a water supply, proper electrical, a drain and you’ve leveled the machine.
You must follow the stated instrucons for:
a. Electrical requirements
b. Water supply and drain connecons
c. Leveling the icemaker.
Enclosed Installaon
An enclosed installaon will allow you to install the ice maker under a cabinet, or in a kitchen cabinet provided the
required clearance space around the ice maker is respected. This installaon has the same requirements as a mobile
installaon. The unit should be placed in the cabinet by sliding it in the cabinet’s opening and leveled properly.
IMPORTANT: For the Mobile and Enclosed installaons you must use exible water and drain connecons
to the water supply and drain. This will allow the moving of the ice maker for cleaning.
Use the water hose and drain hose supplied with the unit for these connecons
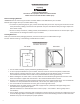
Built-in installaon
If this method of installaon is chosen, it will sll be necessary to allow adequate venlaon space around the unit.
The following addional items must be observed.
1. Place ice maker in front of installaon locaon. Remove the feet and place the unit at on the oor or on a
plaorm depending on your installaon requirements.
2. The water supply line must be plumbed before connecng to the ice maker.
3. Turn on main water supply and tap. Check for water supply connecon leaks. Tighten any connecons
(including connecons at the valve) or nuts that leak.
4. Pour 1 gallon (3.79L) of water into the ice storage bin to check leaks at all drain connecons and the nut of the
drain water hole. Tighten any connecons or nuts that leak.
5. If the electrical outlet for the ice maker is behind the cabinet, plug in the ice maker.
6. Push the ice maker into posion.
7. Seal all around the cabinet to the oor with an approved caulking compound.
NOTE: Be sure the drain hose is connected and fed into the drain line before the ice maker is
moved into its nal posion.