MI M50I NST RUCT I ONMANUAL
TABLE OF CONTENTS Page ICE MAKER SAFETY ..................................................................................................... 2 IMPORTANT SAFEGUARDS ....................................................................................3 - 5 TECHNICAL INFORMATION ........................................................................................ 5 INTRODUCTION .............................................................................................................
ICE MAKER SAFETY Your safety and the safety of others are very important. We have provided many important safety messages in this manual and on your appliance. Always read and obey all safety messages. This is the Safety Alert Symbol. This symbol alerts you to potential hazards that can injure or kill you and others. All safety messages will follow the Safety Alert Symbol and either the words "DANGER", "WARNING" OR "CAUTION".
IMPORTANT SAFEGUARDS Before the ice maker is used, it must be properly positioned and installed as described in this manual, read the manual carefully. Maxx Ice strongly recommends that you have a professional install your new machine. The warranty may be affected or voided by an incorrect installation.
It is important for the ice maker to be leveled in order to work properly. Otherwise water may not flow properly through the evaporator (ice mold). The ice production will be less than normal. You may need to make several adjustments to level it. All installations must be in accordance with local plumbing code requirements. Make certain that hoses are not pinched, kinked or damaged during installation. Check for leaks after water line is connected.
Extension Cord Because of potential safety hazards under certain conditions, it is strongly recommended that you do not use an extension cord with this ice maker. TECHNICAL INFORMATION Model: Electrical power: Power consumption: Ice-making /-harvest rated current: Refrigerant: High/Low side pressure: Width x depth x height: MIM50 120VAC ~ 60Hz 13.2 kWh per100 lbs of ice 3.7A/4.8A R134a, 7.06 oz.
INTRODUCTION TheMaxx Ice MIM50 Ice Maker produces hard, crystal-clear, gourmet cube ice, and offers convenience for homeowners and hotel guests. An insulated ice storage bin is built in. In addition, you have the option of using an internal or external drainage system. This user's manual is intended as a resource for persons installing, using and servicing the model MIM50. It contains valuable information on safety and maintenance.
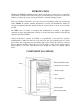
Ice scoop Power cord Water inlet Drain outlet Drain hose Water supply hose ICE MAKER INSTALLATION Unpacking Excessive Weight Hazard Use two or more people to move and install ice maker. Failure to do so can result in back or other injury. Remove packaging materials NOTE: Do not remove any permanent instruction labels or the data label on your ice maker. Remove tape and glue from your ice maker before using. To remove any remaining tape or glue, rub the area briskly with your thumb.
using it. See the "Interior cleaning" in the Cleaning and Maintenance section. Location requirements INSTALLATION CLEARANCES: SIDE VIEW TOP VIEW 1” 4” Top of unit Rear of unit 1” Side 1” Side Front of unit This ice maker should be properly installed by qualified personnel. To ensure proper ventilation for your ice maker, the front of the unit must be completely unobstructed. When installing the ice maker under a counter, follow the recommended spacing dimensions shown.
Normal operating ambient temperature should be between 50°F (10°C) to 100°F (38°C). Normal operating water temperature should be between 41°F (5°C) and 90°F (32°C). Operation of the ice maker for extended periods outside of these normal temperature ranges may affect production capacity. It is strongly recommended that a water filter be used. A filter, if it is of the proper type, can remove taste and odors as well as particles.
A standard electrical supply, properly grounded in accordance with the National Electrical Code and local codes and ordinances, is required. The ice maker should always be plugged into its own dedicated electrical outlet. It is recommended that a separate circuit, serving only your ice maker, be provided. Use receptacles that cannot be turned off by a switch or pull chain. The fuse (or circuit breaker) is spec’d at 15 amperes.
Tools needed: flathead screwdriver, Phillips screwdriver NOTE: Before you begin, unplug the ice maker or disconnect power. To remove door from hinges: 1. Remove the top hinge cover. 2. Using a Phillips screwdriver, remove the screws, remove the top hinge mat and top hinge. Keep the parts together and set them aside. 3. Lift the door off of the bottom hinge and set the door aside. To replace door on hinges: 1.
Water Supply The water supply should be ready at the point of installation. The water supply pressure should be a minimum of 15 psig with a static pressure not more than 80 psig. (A wall outlet directly behind the ice machine will make installation easier.) NOTE: 1. All installations must be in accordance with local plumbing code requirements. Professional installation is recommended. 2. Make certain the hoses are not pinched or kinked or damaged during installation. 3.
into the drain line. NOTE: Never allow the drain hose to hang or loop higher than the floor of the ice storage bin. 3. Screw off the water drainage nut and pull off the plug on the rear of the ice storage bin. NOTE: Store the drainage nuts and plugs in the compartment labeled Nut/Plug Storage at the back of the unit or in another safe place. All horizontal runs of drain lines must have a fall of ¼” per foot.
every connection (including connection at the water inlet). 4. If the electrical outlet for the ice maker is behind the cabinet, plug in the ice maker. 5. Push the ice maker into position. 6. Seal all around the cabinet to the floor with an approved caulking compound. NOTE: Be sure the drain hose is connected and fed into the drain line before the ice maker is moved into its final position. OPERATION Final Check List prior to Operation 1.
2. After 3 minutes, the machine will automatically go to the ice-making stage, and the sound of water flowing will be heard. 3. When the batch of ice has been fully formed, ice will automatically be harvested to the ice storage bin. 4. When the ice storage bin is full, the sheet of cubes will not fall completely and will hold the bin-full probe open. The machine automatically stops making ice and progresses to the cold preservation stage.
enters into the water trough continuously as the water in trough freezes continuously in the evaporator. Evaporator Water inlet Water pump Hot gas valve Compressor Fan motor Condenser How to adjust the capacity of the ice storage bin The ice storage capacity can be adjusted by moving the shelf adjustors to different positions (see below). You can decide the shelf’s most efficient placement according to your usage of ice.
stored on top of the ice maker can also make noises. The high efficiency compressor may make a pulsating or high-pitched sound. Water running may make a splashing sound. You may hear air being forced over the condenser by the condenser fan. During the harvest cycle, you may hear the sound of ice cubes falling into the ice storage bin.
CLEANING AND MAINTENANCE If the ice maker is left unused for a long time, before the next use it must be thoroughly cleaned. Follow carefully any instructions provided for cleaning or use of sanitizing solutions. Do not leave any solution inside the ice maker after cleaning. Periodic cleaning and proper maintenance will ensure efficiency, top performance, and long life. The maintenance intervals listed are based on normal conditions.
hard, stubborn stains. Also, hard water stains left to sit can weaken the steel's corrosion resistance and lead to rust. Use a nonabrasive cloth or sponge, working with, not across, the grain. 2. Don't use abrasive tools to clean the steel surface. Do not use steel wool, abrasive sponge pads, wire brushes or scrapers to clean the steel. Such tools can break through the "passivation" layer - the thin layer on the surface of stainless steel that protects it from corrosion. 3.
2. Make sure all ice is off evaporator. If ice is being made, initiate harvest or wait for cycle completion, then turn machine off at the power switch. 3. Remove all ice cubes from the storage bin. 4. Keep the ice maker connected to the water supply. Pour 4 oz. of Nickel-Safe Ice Maker Cleaner Solution into the water tank. 5. Turn on the power switch. Within 3 minutes press the Clean button. The machine will go into the cleaning mode automatically. 6. Allow 30 minutes for proper cleaning.
12. Repeat step 5-6 above with clean water to rinse the ice-making system thoroughly. Drain the water as indicated in Step 11. This will complete ice-making system cleaning. Then press the controller to “OFF” 13. Turn the machine ON and replace the front panel. 14. Discard the first two ice harvests. DO NOT USE any ice produced from the cleaning solution. Bin Cleaning The ice storage bin should be sanitized occasionally.
6. Plug in the ice maker or reconnect power. DO NOT touch the condenser fins. They are sharp and can be easily damaged. Water distribution tube cleaning When you find the ice cubes are incompletely formed or the output is low, the water distribution tube may be blocked. Turn off the power button, rotate the water distribution tube, locate the holes in the distribution tube and use a pointed object such as a toothpick to dredge the holes.
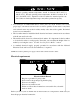
Description of LEDs and buttons: 1. Bin Full (Red) LED: Bin full indicator light When this is lit, the ice storage bin is full of ice or there is some thing blocking the bin-full probe. The unit will stop working. When ice cubes are removed from the ice storage bin, freeing the bin-full probe, the red LED will remain flashing for 3 minutes, then the unit will restart and return to the ice making mode. 2.
TROUBLESHOOTING Before Calling for Service If the unit appears to be malfunctioning, read through the OPERATION section of this manual first. If the problem persists, check the Troubleshooting Guide on the following pages. Some of the problems mentioned in the Guide can be solved easily without a service call. Troubleshooting Guide Problem The machine doesn’t operate. Possible Cause Probable Correction The ice maker is unplugged. Plug the ice maker in. Replace fuse.
Cubes are partially Not enough water in the formed or are white water trough. on the bottom. Noise during operation The feet are not leveled and locked. Certain sounds are normal. The electricity is off. The ice maker stops The room temperature is out suddenly while of the stated range. making ice. The ice storage bin is full of ice. The body of the ice The ground line isn't in the maker is electrified socket. Scaling occurs The hardness level of the frequently inside water is too high. the machine.
MAXXI CE 3355Ent er pr i s eAvenue,Sui t e160Wes t on,F l or i da33331 T el :9542027419 -F ax:9542027337