
Use and Care Manual


HRD INS 30WM REV. 12/8/20 Page 3
4. Secure with the (4) M5x15 screws and flat washers that were removed in Step 2.
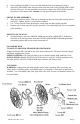
5. Slide the FAN BLADE onto the motor shaft until the front of the FAN BLADE is flush
with the shaft end. Use the provided hex wrench to tighten the SET SCREW onto the
flat portion of the motor shaft. Caution: Do not alter the angle of the blades.
FRONT GUARD ASSEMBLY
1. Align front and rear grilles. Slide zip tie through top hole of front grille and top hole of
rear grille. Tighten zip tie to secure grilles together.
2. Use 7 of the 8 black screws provided to secure front and back grilles together.
3. Remove zip tie from top hole of grille assembly. Use remaining black screw to complete
grille assembly.
MOUNT FAN TO WALL
4. Using assistance, insert the SWIVEL ARM into the WALL BRACKET. Adjust the
direction of the fan and secure with the SWIVEL ADJUSTMENT KNOB (horizontal
movement) and the M6 screw (vertical movement).
FAN OPERATION
TO ADJUST AIRFLOW UPWARD OR DOWNWARD:
Slightly loosen the M12 and M6 screw at the base of the motor. Tilt motor to desired angle,
and firmly retighten the screws.
SPEED CONTROL: Pull chain on motor to set to desired setting: high, medium or low.
OSCILLATION: (Model: HVPF 30 OSCWM only) To oscillate / lock the position of the
fan head, pull the OSCILLATING KNOB up to oscillate and down to lock.
CLEANING
WARNING: Unplug from electrical supply source before cleaning. After servicing, any
safety device (including grilles and blades) must be reinstalled or remounted as previously
installed. Use a soft damp cloth, then wipe with a dry cloth. Do not use harmful cleaners. Do
not bend blades.