
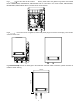
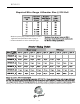
Technical data

■ Trouble-shooting
7, 8 and 9 should only be performed by a qualified electrician. The person who initially installed the unit is
the best one to contact for help.
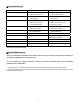
■ Normal Maintenance
Note: Do not attempt to repair this water heater yourself. Call a service person for assistance. Always turn
off the power supply before servicing your unit.
It is not required any regular maintenance. However, to ensure consistent water flow, the following
maintenance is recommended.
1. Periodically remove scale and dirt that may build up at the aerator of the faucet or in the shower head.
2. There is a built in filter screen at the inlet connection which should be cleaned from time to time. Please turn off the
water flow before doing this.
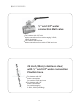
Problems Possible Causes Corrective Actions
1. Inlet and outlet fittings leaking A. Fittings not tight
B. Rubber washer worn-out
A. Tighten fittings.
B. Change rubber washer.
2. LED no signal A. Power not connected.
B. LCD damaged.
A. Connect power to the unit.
B. Change LCD.
3. Functional keys not working A. No water out from shower.
B. Water pressure too low.
C. Key or PCB damaged.
A. Open valve to get water.
B. Open valve to get pressure.
C. Change key or PCB.
4. Water too hot A. Temperature set too high
B. Water flow too small.
A. Set a lower temperature.
B. Increase valve opening.
5. Water too cold A. Low temperature set.
B. Too much water flow.
A. Set a higher temperature.
B. Reduce water flow.
6. Outlet gets less and less water. Inlet strainer or shower clogged. Clean strainer and shower.
7. LED displays E1 Outlet temp. is over 60℃/140℉ A, Reduce the temperature
B, Increase the water flow
8. LED displays E2 There is electricity leakage Please contact your local dealer
9. LED displays E3 Temperature sensor failure Please contact your local dealer
10. Display overload Inlet water flow is too big. Reduce the inlet water flow
11