Generator Operator’s Manual
TABLE OF CONTENTS CHAPTER PAGE 1. About Your Generator 1 2. Parameter 3 3. General safety precau ons 4 4. Specifica ons 6 5. Components 7 6. Pre-opera on checks 8-10 7. Wheels and handles installa on 11 8. Opera ng procedures 12-17 9. Wa age informa on 17 10. Maintenance schedule 18-19 11. How-To maintenance 20-21 12. Transpor ng and storage 22 13. Troubleshoo ng 23 14. Wiring diagram 34 15.
ABOUT YOUR GENERATOR Thank you for purchasing a MAXWATT generator (hereina er referred to as the generator). This generator is suitable for use on various trade worksites, recrea for use as backup power whether residen or commercial. nal such as camping and With built-in Pure Sine Wave technology (THD<5%), its perfect for powering tools, domes c electronics.
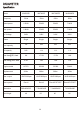
MX3000R MX7000R MX7000ES MX9000ES 50Hz 50Hz 50Hz 50Hz Rated power 2.5KW 5.0KW 5.0KW 7.0KW Max. power 2.8KW 5.5KW 5.5KW 7.5KW AC Voltage 240V 240V 240V 240V Phase Single Single Single Single Fuel capacity 15L 40L 40L 40L Oil capacity 0.6L 1.1L 1.1L 1.1L Run time@50% load 9H 17.5H 17.5H 16H Run time@100% load 6.5H 14H 14H 11H Engine model AP170 SC390 SC390 SC460 Displacement 208cc 389cc 389cc 459cc Max. output 6.
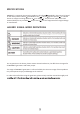
SPECIFIC ATI O NS MAXWATT is constantly improving its products. All informa upplied in this manual is based e of prin ng. The specifica ns outlined on the latest product informa on available at the herein are subject to change without no ce or obliga n. The purchaser and/or user shall assume liability for any modifica and/or altera ns of this equipment from original design or manufacture.
BEFORE STARTING U N PACKIN G A N D DE L IVE RY IN S PEC T ION You should inspect the generator immediately a er you receive delivery thereof. If you have any missing parts, please contact your place of purchase. DO NOT a empt to operate the generator if there are any missing parts. The generator is shipped without oil. You must add an adequate amount of engine oil before . The engine will be damaged beyond repair if it is started without oil.
NEVER plug the generator directly into a wall plug outlet. ANY connection to a building’s electrical system MUST ISOLATE THE GENERATOR FROM UTILITY POWER via a transfer switch installed by a licensed electrician. Otherwise, back-feed from the generator into the power grid could kill utility workers. See “Set up as a building back-up” on page 13 for additional information. BEFORE performing any maintenance on the generator, disconnect the engine starting battery (if equipped) to prevent accidental start-up.
Keep your work area clean and well lit. Clu ered benches and dark areas invite accidents. This generator is not weatherproof. Exposure to rain, damp condi ns or extreme temperatures can cause damage and/or serious injury. PERSONAL SAFETY Stay alert, watch what you are doing and use common sense when opera ng a generator. DO NOT use a generator while you are red or under the influence of drugs, alcohol or medica on. A moment of ina en on may result in serious personal injury.
Damaged. DO NOT operate the generator with damaged, missing or broken parts. Modifica ons. DO NOT modify the generator in any way. Modifica ns can create hazards and will also void the warranty. Generator speed. NEVER a empt to modify the generator speed se ng. The generator speed is present for safe and op mal performance of the generator. If speed needs adjus ng, it must be done by factory personnel. External fuel sources. NEVER a empt to connect external fuel sources in order to increase generator run me.
SERVICE Have your generator serviced by a qualified repair person using only factory approved replacement parts. This will ensure that the safety of the generator is maintained. Incorrectly fitted parts will void your warranty. The equipment may only be used, maintained or repaired by those persons who understand and have been instructed about the potential dangers. Independent changes in the equipment cancel any manufacturer’s liability for any damages that result from these changes.
the grounded petrol dispenser nozzle as the nozzle is first brought close to the tank/container at the beginning of the fuelling process. Flowing petrol. Most people are not aware that petrol accumulates static electric charge while flowing through a hose or pipe. This charge then transfers to and accumulates in the gas tank or container that is being filled.
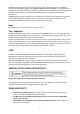
Fuel Valve Fuel Gauge Fuel Cap Control Panel. See next page for panel identification designed for your generator.
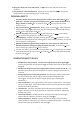
CONTROL PANEL IDENTIFICATION MODEL:MX3000R 3 DIGITAL METER ENGINE SW. 4 6 AC 240V AC 240V CIRCUIT BREAKER ON ON 1 3.5kVA OFF OFF POWER LAMP GND 7 2 8 MODEL: MX7000R 2 3 4 5 6 1 7.0kVA 8 1. 2. 3. 4. ENGINE SW. POWER LAMP POWER LAMP AC OUT PUT 7 5. 6. 7. 8.
MODEL: MX7000ES 2 3 4 5 6 1 7.0kVA 8 7 MODEL:MX9000ES 2 3 4 5 6 1 9.0kVA 8 1. 2. 3. 4. ENGINE SW. POWER LAMP POWER LAMP AC OUT PUT 7 5. 6. 7. 8.
ENGINE KEY ST ART IGNITION SWITCH Engine start and on/off switch control. DC BREAKER Protects the generator against overload or short circuit of the 12-Volt DC system. If the circuit breaker trips, turn off and unplug all appliances from the generator and let the overload cut-out switch cool. Then press DC reset bu on before commencing to use the DC outlet. LOW OIL INDICATOR The low oil level indicator light illuminates When the oil level is too low.
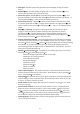
ASSEMBLY Re m ov e s h ip p in g b ra cket (Fig 1) Remove and discard the RED shipping bracket and moun ng hardware before star ng the generator. A tta c h in g w h e e ls (Fig 2) Parts needed – 2 wheels, 2 axles, 2 locking pins, 4 washers, 2 hub caps and 2 selftapping screws. Raise or t generator so you can slide the wheel axle pin into the wheel, the washer, the wheel moun ng hole located on the site of the frame and the other washer.
GENERATOR SET UP PLANNING THE POWER LOAD Plan your power load so that you do not exceed the generator’s rate capacity. To calculate the running and start-up wa age requirements for the devices you will be powering, follow the steps on page 18. SET UP THE PORTABLE POWER SOURCE This generator is designed to provide up to its max power (in wa s) of electrical power.
If your generator will be connected to your building’s system, it MUST ALWAYS BE isolated from the utility power grid with an approved transfer switch installed by a licensed electrician in compliance with all applicable building and electrical codes and in accordance with the guidelines supplied by your power company. There may be Federal or State Occupational Safety and Health Administration (OSHA) regulations, local codes or ordinances that apply to the intended use of the generator.
IMPORTANT: This generator is fitted with a MEN link cable, the neutral is internally bonded to the generator earth. When a licensed electrician is installing the generator to a building to be used as a backup power source, the MEN must be removed. The MEN link is located underneath the alternator end cap which is labelled to indicate its location. The MEN link cable is clearly labelled as “MEN link.
The location you choose to operate the generator must be OUTDOORS and away from all building air intakes. Never run the generator inside any closed or semi-enclosed spaces (even if outdoors), including homes, garages, basements, sheds or boxes. These spaces can trap poisonous gases, even if you run a fan or open windows. Ensure that working, battery-operated or battery back-up carbon monoxide alarms are used in any dwelling/structure that is in close proximity to the running operator.
canopy-like structure of heat-resistant material that is open on all sides. Make sure that all parts of the canopy are at least 2m from the exhaust and allow for adequate clearance above the generator so that heat does not build up. OPERATE AWAY FROM DUST/DIRT Do not use the generator in extremely dusty or dirty conditions. Excessive dust and dirt can cause premature failure of the machine.
POWER LOADING MANAGEMENT Your generator MUST BE SIZED PROPERLY to provide both the running and star ng (surge) wa age of the devices you will be powering. Before using your generator, determine the running and star ng wa age requirements of all the electrical devices you will be powering simultaneously. Following below are 4 simple stepts and an example on the right: Step 1 Step 2 Step 3 Step 4 Determine the tools and appliances you want to power at the same me.
STARTING THE ENGINE PRE-OPERATION CHECK 1. Check that all shields and covers are in place and all nuts, bolts and screws are htened. 2. Check the engine oil level. Add oil if low. Do not overfill. Running the engine without sufficient oil can cause irreparable damage. 3. Check fuel level. Add fuel if low (Fresh unleaded RON91) recommended. Star ng with a full tank will help to eliminate or reduce opera ng interrup ons for refuelling. Check fuel system components and lines for signs of leak. 4.
TO S TART T HE ENGINE 1. 2. 3. Disconnect all loads to the generator. Turn off the master switch to ensure that no electrical current is connected to the generator. Turn the fuel valve lever to the ON posi n. Wait for a minute for the fuel to enter the carbure or (for first me use). For cold engines, move choke lever to full choke posi on. To restart a warm engine, move choke lever to half choke or to RUN posi on. U S IN G KEY START T O START ENGINE 1. 2. 3.
ENGINE SPEED Engine speed has been factory set to provide safe operation. Tampering with the engine speed adjustment could result in the overheating of attachments and could cause a fire. CONNECTING LOADS You will want to be careful when connecting loads so as to not overload the generator, especially if you are powering devices with motors that require a higher starting power load. Instructions are provided below for connecting loads when you are using the generator as a portable power source.
CHARGING A BATTERY Remove the battery from the car, boat or any other device. The battery MUST be totally isolated from any other circuitry. After connection to the battery, RECHECK to ensure the connections are as below: Insert the T-shaped plug to the generator with the opposite end of the cable connected to the battery. Connect the positive (+) alligator clip (red) to the positive (+) terminal on the battery.
STOPPING T HE G E N E R ATOR Stop the engine using the following steps: 1. 2. 3. 4. 5. Turn off all appliances. Disconnect all loads to the generator. Never start or stop the generator with electrical devices plugged in or turned on. Allow the generator to idle for 2-3 minutes and cool down. Turn the engine switch to the OFF posi n. DO not leave the generator un it has completely stopped. Turn the RCBO switch to OFF posi on. Turn the fuel valve to OFF posi n.
STORAGE When you are finished using the generator, you must: Disconnect all loads Shut off fuel supply Disconnect spark plug and ba ery Store the generator properly Plan on opera ng the engine regularly unless the generator is prepared for longterm storage. DIS CONNECT L O A DS AND TU RN O F F THE FUEL S U P P L Y When you are finished using the generator, disconnect all loads and turn off fuel supply. Make sure all devices that were connected to the generator’s outlets have been disconnected.
OPERATE THE ENGINE REGULARLY The generator should be operated regularly to maintain the condition of internal parts. At least every four weeks, start the engine and let it run for 10 to 15 minutes with a small load plugged in such as a lamp or fan. Monthly operation of the generator will dry out any moisture that has accumulated in the windings which if left, can cause corrosion. It will also ensure that the unit is operating properly should it be needed in an emergency.
TRANSPORTING If the generator has been used, allow it to cool for at least 15 minutes before loading the generator on the transport vehicle. A hot engine and exhaust system can burn you and can ignite some material. Take care not to drop or strike the generator when transporting. Do not place heavy objects on the generator. When transporting the generator, turn the engine switch and the fuel valve lever OFF and keep the generator level to reduce the possibility of fuel leakage.
Allow the engine to cool completely before servicing the spark arrester. Remove the spark arrester, check and clean with a wire brush. Replace spark arrester if its damaged. KEEP GENERATOR CLEAN If dust or debris accumulates on the generator, clean the generator with a damp cloth or soft bristle brush. DO NOT allow air intakes to become blocked. Note: DO NOT spray generator with a garden hose or pressure washer. Water may enter the generator and cause damage to the rotor, stator or internal windings.
REPLACING FUEL FILTER Occasionally the fuel inline filter may become clogged and need replacing. Remove the fuel line from both sides of the filter by squeezing the ends of the retaining clip with pliers. Slide the fuel line off and replace with new fuel filter. reinstall fuel lines to new fuel filter.
GENERAL RECOMMENDATIONS Regular maintenance will improve the performance and extend the life of the generator. See any authorised dealer for service. The warranty does not cover items that have been subjected to operator abuse or negligence. To receive full value from the warranty, the operator must maintain the engine as instructed in the manual. Some adjustments should be made periodically to properly maintain your generator. All service and adjustment should be made at least once each season.
MAINTENANCE LOG MAINTENANCE LOG Your Maxwatt generator is protected by a 2 year limited warranty (3 month on battery) that covers the product for normal use. The warranty statement is found on the back of this manual. You must understand that negligence or misuse is not covered in the warranty and failure to properly maintain and service the engine, can void your warranty.
34
WIRING DIAGRAM
LABEL GASOLINE GENERATOR MX7000ES 7.0kVA Risk of fire. Check for any fuel overflow or leakage. Stop the engine before refueling. Generator is a potential source of electric shock. Do not expose to moisture, rain, or snow. Do not operate with wet hands or feet. Failure to properly ground generator can result in electrocution, especially if the generator is equipped with You could be killed or seriously a wheel kit. hurt if you do not follow the Exhaust contains poisonous Operator’s Manual instructions.
WARRANTY INFORMATION 2 YEAR TRADE WARRANTY This warranty is provided by Gentech Industries PTY LTD. Express Warranty Subject to the exclusions set out below, we warrant that this product will be free from defects in materials or workmanship for 24 months from the date of purchase. The benefits conferred by this warranty are in addition to all rights and remedies which you may be entitled to under the Australian Consumer Law and any other statutory rights you may have under other applicable laws.
WARRANTY PROCEDURES: STEP 1 STEP 2 STEP 3 • You must register your purchase/warranty online (visit www.maxwatt.com.au). • Consult the "trouble shooting" guide supplied and follow ALL check points. • Contact GENTECH INDUSTRIES for techincal assistance prior to booking your generator in for repairs.
BELOW IS A LIST OF GENERATORS THAT IS COVERED UNDER THIS WARRANTY: MODELS MAXWATT ALL MODELS WARRANTY PERIOD WARRANTY PERIOD PRIVATE/RESIDENTIAL COMMERCIAL/RENTAL 24 months or 500 running hours which ever come first 24 months or 300 running hours which ever come first EXCLUSIONS TO THIS LIMITED WARRANTY INCLUDE: Neglect in the periodic maintenance as specified in the owner’s manual. Improper repairs or maintenance including any repairs and or maintenance carried out by a non-accredited service agent.
BELOW IS A TABLE OF PARTS THAT ARE LIMITED BY THIS WARRANTY: PART OUT OF BOX FAILURE STATOR * ROTOR * CIRCUIT BREAKER * AVR * < 20 RUNNING HOURS IGNITION COIL * SPARK PLUG * BATTERY * WHEELS AND AXLE * HANDLES * RECOIL STARTER * *NOTE: OUT OF BOX FAILURE REFERS TO A MACHINE THAT HAS RUN FOR < 20 MINUTES.
Gentech Industries PTY LTD require satisfactory proof of purchase before providing a remedy under the Australian Consumer Law. DAMAGED IN TRANSIT Please do not sign for the delivery of goods that are obviously damaged. If damage is only found upon unpacking then please contact the store that fulfilled your order as soon as possible. Store contact details can be found on your order confirmation email. They will then arrange for the goods to be collected and a refund or replacement item sent out to you.
32082-03080-00