
User manual

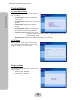
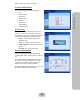
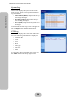
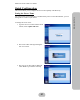
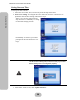
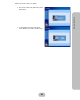
Table Of Contents
- Maxtronic_Orion410PT_UGTOC.pdf
- preface.pdf
- Preface
- About this Manual
- Copyright Notice
- Conventions
- This symbol is used to remind users to pay attention to important descriptions regarding usage and maintenance (repair) or additional important information related to this Orion 410ST NAS System.
- This symbol is used to provide users with useful information that can make procedures such as configuration easier to accomplish.
- Safety Instructions
- Limited Warranty
- EMC Certificate
- Chapter1.pdf
- Chapter2.pdf
- 2 Getting Started
- Hardware Installation
- Power Connection
- Network Connection
- Hard Disk Drive Installation
- 1. Connect the power cord and LAN cable.
- 2. Unlock the HDD caddy with the key provided.
- 3. Pull out the handle of the HDD caddy.
- 4. Pull out the HDD caddy and remove from the tray (four caddies).
- 5. Power on the system, and the Orion 410ST NAS System will perform startup self-configurations.
- 6. Wait until the self-configuration is complete, and the system information shows on the LCD screen, hot plug the HDD caddies with disks into the tray.
- 7. Push back the handle of the HDD caddy.
- 8. Lock the HDD caddy with the key. Keep the key safe for future use.
- 9. Start configuration either with the front control panel or the browser interface.
- 1. The HDD(s) have been initialized by the same Orion 410ST and have been performing daily routine tasks.
- 2. Performing “Disk Roaming” procedure to reduce system down time.
- a. Power off the old NAS system.
- b. Execute Factory Default on the new NAS system and then power it off.
- c. Remove the HDD(s) from the old NAS system.
- d. Insert the HDD(s) into the new NAS system. Please be sure the model and firmware of the new system are the same as the old one.
- e. Power on the new NAS system and Disk roaming is complete.
- Disk and Caddy Assembly
- Using the Front Control Panel
- Chapter3.pdf
- 3 Orion 410ST System Setup
- System Boot-up
- System Setup
- System Login
- Main Menu
- 1 Network Menus
- Since the Orion 410ST provides only one LAN connector, only ‘Channel 0’ will be shown.
- 1. Press ENT to view detailed CH0 status information.
- 2. If the LAN cable is connected, an ‘ON CONNECTED’ message will be displayed.
- 3. If the LAN cable is disconnected, an ‘ON DISCONNECTED’ message will be displayed
- 1. Use the up or down button under the 11 Channel 0 submenu to enter the ‘112CH0 IP ADDR’ and press ENT to confirm.
- 2. Press ENT again to enter the ‘Set CH0 IP’ screen. The current IP address will be displayed.
- 3. To set the IP address, press ENT again.
- 4. A flashing gray square appears. Use the up and down buttons to adjust the value of each digit. Before entering the next digit, press ENT to confirm the input.
- 5. After the IP address setup is complete, press ENT to confirm.
- 6. The system will automatically reboot after the new IP address is set.
- 1. Use the up or down button under the 11 Channel 0 submenu to enter the ‘113CH0 Netmask’ and press ENT to confirm.
- 2. Press ENT again to enter the ‘Set CH0 Netmask’ screen. The present netmask IP address will be displayed.
- 3. To set a netmask IP address, press ENT again.
- 4. A flashing gray square appears. Use the up and down buttons to adjust the value of each digit. Before entering the next digit, press ENT to confirm the input.
- 5. After the netmask IP address setup is complete, press ENT to confirm.
- 6. Press ESC to exit the netmask IP setup screen.
- 1. Use the up or down button under the 11 Channel 0 submenu to enter the ‘114Gateway’ and press ENT to confirm.
- 2. Press ENT again to enter the ‘Set CH0 Getway’ screen. The current gateway address will be displayedn.
- 3. To set a gateway address, press ENT again.
- 4. A flashing gray square appears. Use the up and down buttons to adjust the value of each digit. Before entering the next digit, press ENT to confirm the input.
- 5. After the gateway address setup is complete, press ENT to confirm.
- 6. Press ESC to exit the gateway setup screen.
- 1. Use the up or down button under the 11 Channel 0 submenu to enter the ‘116DHCP Status’ and press ENT to confirm.
- 2. The DHCP status will be displayed.
- 3. To set the DHCP status, press ENT again.
- 4. A query message appears. Use the up and down buttons to move the arrow to ‘NO’, and press ENT to confirm the selection.
- 2 System
- 1. Use the up or down button under the 21Clock submenu to enter the ‘211Date’ and press ENT to confirm.
- 2. Current date information will be displayed.
- 3. To change the date, press ENT again.
- 4. A flashing gray square appears. Use the up and down buttons to adjust the value of each digit. Before entering the next digit, press ENT to confirm the input.
- 5. Press ESC to exit the date setup screen.
- 1. Use the up or down button under the 21Clock submenu to enter the ‘212Time’ and press ENT to confirm.
- 2. Current time information will be displayed.
- 3. To change the time, press ENT again.
- 4. A flashing gray square appears. Use the up and down buttons to adjust the value of each digit. Before entering the next digit, press ENT to confirm the input.
- 5. Press ESC to exit the time setup screen.
- 1. Use the up or down button under the 22Shutdown submenu to enter the ‘221Reboot System’ and press ENT to confirm.
- 2. A query message shows on the LCD screen. Use the up or down button to select ‘Yes’ or ‘No’.
- 3. If ‘Yes’ is selected, the Orion 410ST will start rebooting automatically.
- 1. Use the up or down button under the 22Shutdown submenu to enter ‘222Halt System’ and press ENT to confirm.
- 2. A query message shows on the LCD screen. Use the up or down button to select ‘Yes’ or ‘No’.
- 3. If ‘Yes’ is selected, ‘Halt System’ will appear on the LCD screen, and the Orion 410ST will shutdown automatically.
- Use this function to shutdown the Orion 410ST NAS System properly.
- 3 Misc
- 1. Press ENT to access the ‘31Setup Passwd’ submenu under the ‘3Misc’ menu.
- 2. The current administrator password shows on the LCD screen. Press ENT again to change the password.
- 3. A flashing gray square appears. Use the up or down button to adjust the value of each digit. Before entering the next digit, press ENT to confirm the input.
- 4. After you have entered the new password, the system will ask you to confirm this password.
- 5. Enter the exact value of each digit to confirm the password.
- 3 Misc
- Resetting the Administrator Password
- Resetting to Factory Default Settings
- 1. Use the up or down button to enter the ‘Factory Default Restore Settings’ menu.
- 2. Press ENT to confirm.
- 3. A warning message shows on the LCD screen with a beep sound.
- 4. A query message shows on the LCD screen. Use the up or down button to select.
- 5. Press ENT to confirm the selection.
- 6. If ‘Yes’ is selected, you must enter the administrator password. After the administrator password is accepted, the Orion 410ST will automatically reboot.
- Chapter4.pdf
- 4 Configuring the User Interface
- Using User Interface
- 1. Open your Internet browser.
- 2. Type the IP address of the Orion 410ST into the browser address bar to access the user interface.
- 3. Log in using the administrator user name and password.
- System Status
- Quick Configuration
- Setting the Server Name
- Setting Date and Time
- 1. Select the correct date, time, area and city from the drop down boxes.
- 2. NTP server setting: To configure the Orion 410ST to connect to a NTP server to update the date and time settings, follow these steps:
- 3. After all the values are set, click ‘Update and Next’.
- 4. The Orion 410ST will update the system information.
- 5. A confirmation message will appear. Click ‘Next’ to proceed to the next step
- Setting the Network
- 1. If the IP address or subnet mask address are changed, modify the fields, entering the new IP and subnet mask addresses.
- 2. After all fields are modified, click ‘Update and next’.
- 3. The system will update all network setup information.
- 4. A confirmation message will appear. Reboot the system to apply all changes.
- 5. If ‘Reboot’ is selected, a reboot warning message appears.
- 6. The system will reboot.
- 7. Once rebooted, click ‘Login’ to log into the Orion 410ST browser interface again.
- Adding Volume
- 1. Click ‘Add’.
- 2. In the next window, there are five types to choose from: Single disk, RAID 0, RAID 1, RAID 3, and RAID 5.
- 3. Select the disks on which you want to create the new volume. Click ‘OK’ to proceed.
- 4. The system will create the volume.
- 5. The new volume is complete. Click ‘Add’ to create another new volume, or click ‘Next’ to proceed to the next step.
- Setting User Level
- Chapter5.pdf
- Appendix.pdf
30
Maxtronic Orion 410ST User Guide
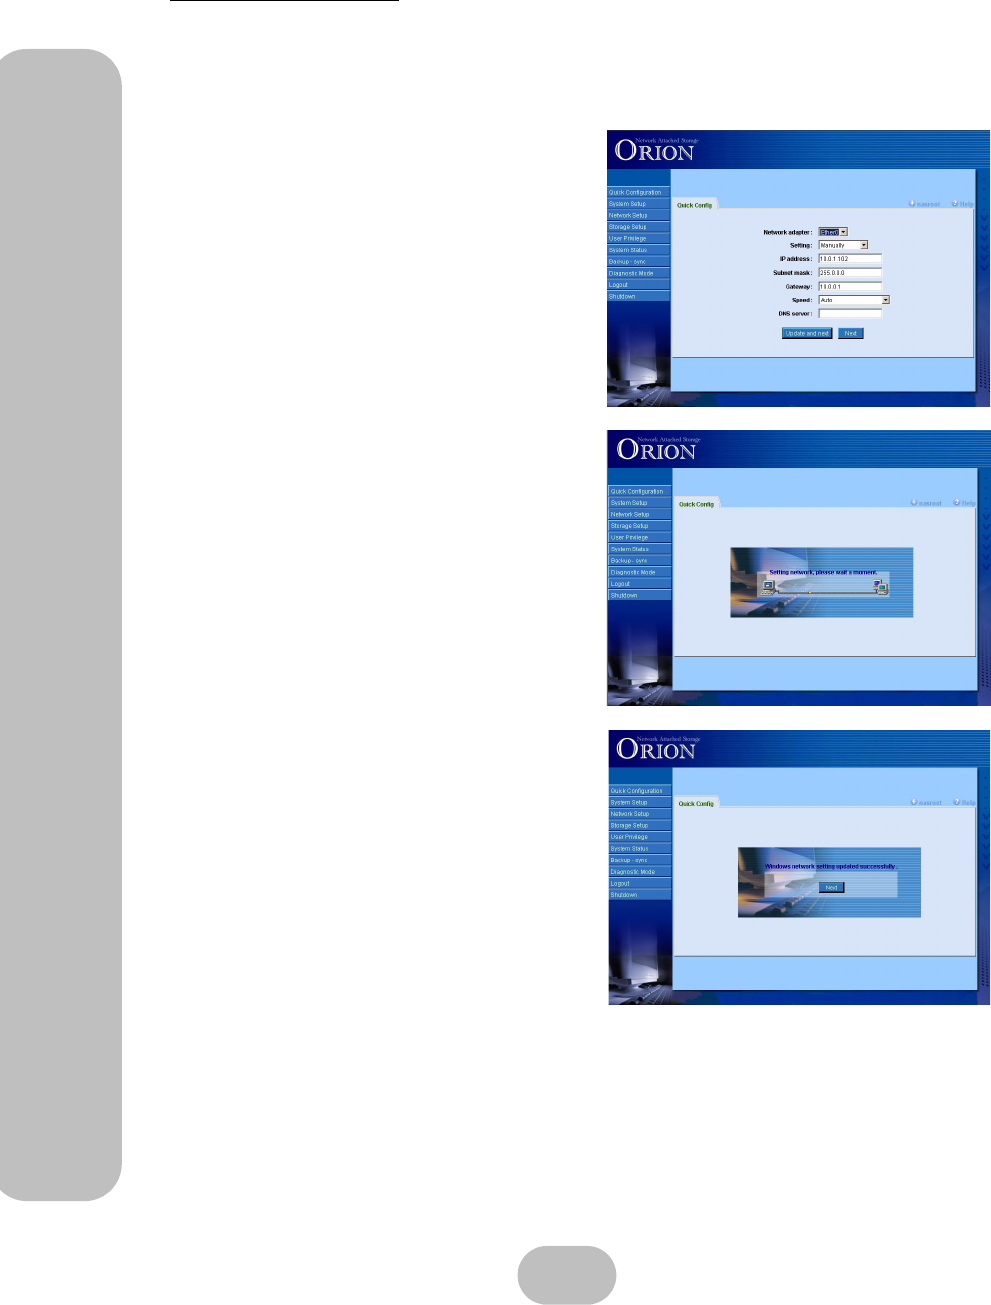
Using User Interface
Setting the Network
Besides being able to set network settings via the front panel, you can also change network
settings in the user interface.
1. If the IP address or subnet mask address are changed, modify the fields, entering the
new IP and subnet mask addresses.
2. After all fields are modified, click
‘Update and next’.
3. The system will update all network setup
information.
4. A confirmation message will appear.
Reboot the system to apply all changes.
•Click ‘Reboot’ to restart the system.
•Click ‘Next’ to proceed to the next step.