4 C H S TA N DA L O N E DV R USER MANUAL 2007.JAN V1.
封面裡空白
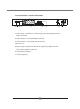
CONTENT 1. HDD SUPPORT LIST 1 2. FEATURES 2 3. HARDWARE OVERVIEW 3 3.1 FRONT PANEL LAYOUT OVERVIEW 3 3.2 BACK PANEL LAYOUT OVERVIEW 4 4. SETUP PROCEDURES 5 4.1 MAIN MENU SETUP 5 4.2 SCHEDULED RECORD 6 4.3 SENSOR SETUP 7 4.4 MOITON SETUP 8 4.5 SYSTEM SETUP 9 4.5.1 HARD DRIVE SETUP 10 4.5.2 PASSWORD SETUP 11 4.5.3 TIME SETUP 12 5. How to backup the recorded data by CD-RW? 13 6. How to connect the hard drive to your PC? 14 7. How to playback the backup records? 15 8.
1. HDD SUPPORT LIST Warning: Should you wish to install a new hard drive in this unit, a list of tested hard drives shown to be compatible can be found below.
2. FEATURE 1.Definitely Standalone. 2.Real Time Refresh Rate. 3.Display While Recording. 4.Frame Recording & Quad Recording. 5.Compatible of NTSC/PAL format. 6.Advanced MJPEG. 7.Manual / Programmed / Motion / Sensor Recording. 8.Search by Time / Date. 9.Watch dog feature. 10.Auto channels switching function 11.Recording automatically 12.Support USB PCLink, Player can search Time to Play 、 save and take photos functions on the PC. 13.CD/RW backup 14.Support convert backup files to AVI format on the PC.
3. HARDWARE OVERVIEW 3.1 FRONT PANEL LAYOUT OVERVIEW 4CH STAND ALONE DVR 1. USB PCLink Port:Connect USB cable to the PC. Please refer to the chapter of 「 How to connect the hard drive to your PC」。 2. Power Indicator. 3. Master HDD Indicator:Master Hard disk status LED. 4. Slave HDD Indicator: Slave Hard disk status LED. 5. CH1:CH1 full screen display. 6. Ch2: CH2 full screen display. 7. Ch3: CH3 full screen display. 8. Ch4: CH4 full screen display. 9.
3.2 BACK PANEL LAYOUT OVERVIEW VGA VCR MONITOR (6) (3) (2) VIDEO IP INIT LOOP OUT LAN IN ALARM OUT (1) DC 12V (4) (7) (5) 1.Video Input : Cameras 1-4 Video Input and Looping Output with BNC connector. 2.Video Output : Corresponding to monitor 3.Video Output : Corresponding to monitor 4.Sensor I/O。 5.Power Input : Please use the power supply included with unit. DC-12V/4A adapter required. 6. VGA Output (Option) 7.
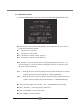
4. SETUP PROCEDURES 4.1 MAIN MENU SETUP Press the ¡§MENU¡¨button to enter the main menu. £ CAMERA ON/OFF:switch on / off the video display of certain camera。 £ RECORD ON/OFF: switch on / off the video record of certain camera 。 £ RECORD MODE: EACH MODE (frame recording)/ QUAD MODE (quad recording).
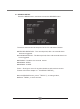
4.2 SCHEDULE SETUP Press the MENU button, and then to enter the RECORD SCHEDULE menu. £ There are 24 circles in the schedule table, which represent 24 hours every circles has 4 options to select: £ - : represents “ no record”. £ T : represents “ fully record” £ M : represents “ motion record” (Rem. 1). £ S : represents “ sensor record” (Rem. 2) . £ For example: you can setup sensor record (S) during the time of 0-3 .
4.3 SENSOR SETUP Press the MENU button, and then to enter the SENSOR menu The alarm sensors can be setup N-O or N-C for individual camera. £ RECORD DURATION:The record period, after an external alarm has been triggered. £ ALARM DURATION:The alarm period, after and external alarm has been triggered. £ DISABLE : Disable the external sensor. £ NORMAL-OPEN £ NORMAL-CLOSE Rem1:Shall go to menu of record schedule to active alarm-sensor. Please refer to the chapter of 「SCHEDULE SETUP」.
4.4 MOITON SETUP Press the MENU button and then enter the MOTION DETECTION menu £ RECORD DURATION: The record period, after a motion has been triggered . £ ALARM DURATION: The alarm period, and motion has been triggered. £ SENSITIVITY – OFF: Disable the motion detection. £ SENSITIVITY – 1 : Lowest £ SENSITIVITY – 5 : Highest Rem1:Shall go to menu of record schedule to active alarm-sensor. Please refer to the chapter of 「SCHEDULE SETUP」. u In the MOTION DETECTION menu, press 「SELECT」to change value .
4.5 SYSTEM SETUP MENU Press the MENU button and then enter the SYSTEM menu You can go to sub-menus of SYSTEM in order to setting up the basic values. £ HARD DISK SETUP:Go to sub-menu of hard disk setup. £ PASSWORD CHANGE:Go to sub-menu of password change . £ TIME SET:Go to sub-menu of time set . u In the SYSTEM menu, press 「SELECT」to go to sub-menu . u Press「UP,DOWN」to move the cursor . u Press「MENU」to save and exit .
4.5.1 HARD DISK SETUP Press the MENU button and then enter the HARD DISK SETUP menu in the system menu You can enable or disable overwriting when HDD is full . £ OVERWRITE ENABLE:When HDD overwrite is enabled, the oldest partition on the HDD will automatically be reused, this means the oldest images will be overwritten by the current images. When overwrite mode is disabled, the HDD Full Warning will appear and will need to be configured. £ FORMAT MASTER HDD:The HDD capacity will be indicated on the screen.
4.5.2 PASSWORD SETUP Press the MENU button and then enter the PASSWORD CHANGE menu in the system menu CURRENT PASSWORD:You can enter new password when £ current password is correct. (Rem1) . £ NEW PASSWORD:Except「MENU」,you can enter 6- figures as new password. £ CONFIRM PASSWORD:Enter and confirm new password again. Rem1:Factory password default 「111111」. u In the PASSWORD menu, press any key to enter the password . u Press「UP,DOWN」to move the cursor . u Press「MENU」to save and exit .
4.5.3 TIME SETUP Press the MENU button and then enter the TIME SET menu in the system menu £ TIME SET:You can set up the date and time . £ APPLY:Press APPLY,the new date and time have been confirmed . u In the TIME SET menu, press SELECT to change the value . u Press「UP,DOWN」to move the cursor . u Press「MENU」to save and exit .
5. How to backup the recorded data by CD-RW? 1.Put the blank CD-R in CD-ROM device. 2.When playback, press「UP」to setup the START TIME . 3.When playback,press「DOWN」to setup the END TIME (Rem1) . 4.Press 「REC」,to start the function of backup . 5.Take off CD-R when burning successfully. Rem 1:Be sure the size of files are not exceeding the max. capacity of CD-R when setup the START/END time for back up.
6. How to connect the hard drive to your PC? Use USB port on DVR front panel (recommend) £ Connect the DVR unit direct to your PC thru USB cable . £ To enter the mode of pc viewer, press STOP to end up the recording. Use IDE to USB convertor (recommend) £ You can connect the DVR” HDD to the IDE cable” to your PC directly. Or via USB adaptor.
7. How to playback the backup records? CD-R Play. £ Put the CD-R in CD-RW device. £ Execute the software of「PC Viewer」. £ Press right button of mouse and select the name of「Open File」 ,select the path of .vvf format to play the recorded data. £ You can copy the certain file to your PC and save it. File Play. Execute the software of「PC Viewer」. £ Press right button of mouse and select the name of 「Open File」,select the path of .vvf format to play the recorded data.
8. How to capture the files? 1.Execute the software of「PC Viewer」. 2.Play the recorded data,press Pause button on the point of target file . 3.Press Pause button and then Press right button of mouse to select 「Capture」 → 「Mark In」. 4.Play the recorded data again, press Pause button on the point of target file. 5.Press right button of mouse to select「Capture」 → 「Mark Out」. 6.Press right button of mouse again, select「Capture」 →「Export」to start capturing the files .
9. How to convert files into AVI format? 1.Execute the software of「PC Viewer」. 2.Press right button of mouse, select「Export」and select format of「AVI」. 3.Select the codec of compression to achieve. 4.Start to convert the file into AVI format . 10. How to setup switching function? 1.Press「QUAD」button ,all channels are displayed . 2.Press 「QUAD」again,to wait for one channel displaying, switching function start working automatically.
H12C042201