VODVR S04IR USER MANUAL 2007 Feb. Ver 1.
4CH STANDALONE DVR CONTENT 1、FEATURE 2 2、SPECIFICATIONS 3 3、INSTALLATION 4 4、FRONT PANEL 5 5、OPERATING MANUAL 6 6、VIEW CONTROL 11 7、PLAYBACK CONTROL 11 8、RECORD CONTROL 12 9、NTSC/PAL SETUP 12 10、4 CHANNEL RECORDING HOURS 13 11、DVR Viewer User Guide 14 Warning !! Please use the certified hard driver below to avoid the compatibility problem.
4CH STANDALONE DVR 1、FEATURE 1、 Definitely Standalone. 2、 Real Time Refresh Rate. 3、 Display While Recording. 4、 Frame Recording & Quad Recording. 5、 Compatible of NTSC/PAL format. 6、 Advanced MJPEG. 7、 Manual / Motion / Programmed 8、 Search by Time / Date. 9、Watch dog feature. 10、HDD Volume Indicator. 11、Can use USB to link PC, Player can search Time to Play、 saving and take photos functions. 12、Internal motion detect feature. 13、Remote Control.
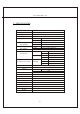
CH STANDALONE DVR 2、SPECIFICATIONS OPERATION SYSTEM Embedded RTOS Video Input NTSC/PAL Video Input Channel Video Output Channel Display Frame 4CH Composite 2CH Composite (VCR OUT / MONITOR OUT) NTSC 120 fps (4x30 fps) PAL 100 fps (4x25 fps) Recording Frame NTSC Max. 30 fps Rate(QUAD) PAL Recording Frame NTSC Max. 7.5fps(30 fps/4) PAL Max. 6.25fps(25 fps/4) Rate(EACH) Recording Mode Max.
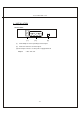
4CH STANDALONE DVR 3、INSTALLATION REAR PANEL VIDEO OUT VIDEO IN 1 CH1 CH2 CH3 CH4 2 DC12V (1) (2) (3) (1) Video Output : Corresponding to Video Input. (2) Video IN : Cameras to Video Input.
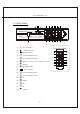
4CH STANDALONE DVR 4、FRONT PANEL (3) (2) (16) (1) (1) (4) (5) (10) (11) Record Indicator (2) (6) (7) (12) (8) (9) (13) (14) (15) DVR REMOTE CONTROL HDD #1 Indicator (3) HDD #2 Indicator (4) 1 (5) 2 Camera #1 Display (Ch1) Camera #2 Display (Ch2) (10) 3 1 (4) (11) 4 2 (5) (12) (6) (13) (7) (6) MENU, Percentage of the Hard Drive recorded (7) SELECT (14) (8) (8) RECORD / STOP (15) (9) (9) PLAY / PAUSE (10) 3 Camera #3 Display (Ch3) (11) 4 Camera #4 Displ
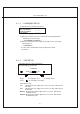
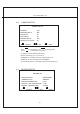
4CH STANDALONE DVR 5、OPERATING MANUAL(MAIN MENU) MAIN MENU SYSTEM SETUP CAMERA SETUP RECORD SETUP RECORD SCHEDULE HARD DRIVE SETUP SYSTEM RESTORE ( ) :SELECT Press Press ( ):SET ( to select items, use to exit ):EXIT to enter. 5-1 、SYSTEM SETUP SYSTEM SETUP BUZZER ALARM TIME VLOSS ALARM MOTION ALARM PASSWORD SETUP TIME SETUP ( ) :SELECT ( :02 S :ON :ON-OFF ):SET ( ):EXIT (1) Buzzer Alarm Time Setup: 1-30 sec. (2) VLoss Alarm:ON/OFF.
4CH STANDALONE DVR 5-1-1 、PASSWORD SETUP Select this item to change password : OLD PASSWORD NEW PASSWORD PASSWORD CONFIRM :______ :______ :______ (1) When the new password is accepted, the board will flash the following screen message. “ PASSWORD CHANGING ” (2) If the password was not accepted, you will receive a message that inform you. “ INCORRECT ” *Use the view control button on the front panel to input the umber. 5-1-2 、TIME SETUP Select this item to set up current time.
4CH STANDALONE DVR 5-2 、CAMERA SETUP CAMERA SETUP CAMERA RECORD SETUP BRI SETUP CON SETUP MOTION SETUP SENSITIVITY SETUP ( ) :SELECT Press Press ( :CH1 :ON :05 :05 :ON :05 ):SET ( ):EXIT to select items. Use to change data. to exit and to save data. (1)Camera select (default value Ch1). (2)Record Set up : yes or no record. (3)Brightness / Contrast Set up : default value is 5. (4)Motion Set up : motion detector, ON/OFF. (5)Sensitivity Set up : sensitivity setup of motion detector.
4CH STANDALONE DVR (1) Record Setup:EACH MODE (frame recording), QUAD MODE (quad recording). (2) Video Quality: video quality selection: High, Normal, Low (3) Record Frame Rate: QUAD MODE frame rate alternatives as follows: →30、20、15、10、7.5、6、5、4、3、2、1 →In this mode 、 1 、 2 3 、 fps. 4 invalid. Each Mode frame rate alternatives as follows: →Maximum : 7.5 fps each camera Totally :30 fps = 7.5 x 4 CH (4) Motion Record Frame Rate: Setting Record Frame Rate as(3) in Motion detector mode.
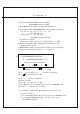
4CH STANDALONE DVR 5-5、 HARD DRIVE SETUP HARD DRIVE SETUP OVERWRITE ENABLED MASTER HDD SIZE MASTER HDD USED MASTER HDD FORMAT SLAVE HDD SIZE SLAVE HDD USED SLAVE HDD FORMAT ( ) :SELECT ( (YES ) 80000MB 0MB0 % N/A N/A ):SET ( ):EXIT (1)Overwrite Enabled YES : Overwrite. NO : Stop Recording. (2)Master HDD Status Indicates use of the master HDD including volume & percentage (3)Master Format Select this item to format HDD, screen show: PASSWORD INPUT (6) -----6 digits.
4CH STANDALONE DVR 5-6、 SYSTEM RESTORE 6、VIEW CONTROL (1)Can use the following view control to monitor images from cameras. 1 Camera #1 (Ch1), return to Quad Mode by press again. 2 Camera #2 (Ch2),return to Quad Mode by press again. 3 Camera #3 (Ch3),return to Quad Mode by press again. 4 Camera #4 (Ch4),return to Quad Mode by press again. (2)Prior to view control, HDD must be formatted. Either “EACH MODE” or “QUAD MODE” should be selected.
4CH STANDALONE DVR (1)EVENT : Press choose one period, then press to play. (2)DATE / TIME : The signal ”>” goes up to the “HARD DRIVER: MASTER”. Press to select items. Use select to change data, Then press to play. (3)PLAYBACK : *Press to speed forward. Continue to press and show x2、x4、x8 multiple playing. *Press *Press *Press to show x2 multiple back motion. to pause. to stop. 8、RECORD CONTROL (1)Press " " key to start recording. Icon " " indicates recording.
4CH STANDALONE DVR 10. 4CH Recording Hours on 80GB Hard Drive *Thereinafter a rough estimate a table for reference only, recording data quantity can follow an image a variation a rate somewhat different.
4CH STANDALONE DVR 11.DVR Viewer User Guide Revision V2.3.N.EN Introduction This document is the Operation Manual for DVR Viewer. The application will show you stream image stored in the HDD which was previously formatted and recorded by the DVR. If any DVR HDD is connected to your PC, the application will automatically detect the HDD and show the recorded stream. You can also save the current screen to a BMP file, and save the current stream to a MYS stream file or an AVI file.
4CH STANDALONE DVR Software Installation Make sure that the OS of your PC is Windows 2000 SP4 or later [XP SP2 or 2003]. Otherwise, the application will not operate properly. Double click on the DVR_Setup.exe to install the program. Execution Just double click the shortcut of the execution file. The application first detects physical HDDs installed at your PC and search for DVR HDD among them. This process may take up to 1 minute. Shortcut to play the video files on your PC via the attached USB cable: a.
4CH STANDALONE DVR DVR Viewer User Interface Functions Valid Stream Region Indication Once a DVR HDD is selected, the application detects valid stream region where valid video stream resides. You can drag this to access the whole streams of the DVR HDD.
4CH STANDALONE DVR Direct Access If the stream stored in a DVR HDD is quite long, you may have difficulty to find the exact scene you want to see. When you find a scene you would like to show your friend or report to police officers later, please remember the number in the Direct Access Input edit box, so that you can go there directly by entering the number in the edit box and pressing “GO” button besides it.
4CH STANDALONE DVR Configure Options Button You can change application settings such as MYS file save directory, or default video mode (NTSC/PAL). To change setting, press Options button Status Button Show the status on the screen. Reset Button Reset the program. Playback Once a DVR HDD is selected, the application automatically displays first screen recorded at the very beginning of it. Then, you can see stream at anywhere within the valid stream reason.
4CH STANDALONE DVR HDD Selection Once the application detects one or more DVR HDDs, it automatically selects the first DVR HDD. You can select any DVR HDD [the DVR HDDs are marked as "VY HDD ". However, you cannot select the normal HDD, which may be Windows-formatted one. Capturing Button Screen Capturing If you want to capture, or backup, current screen, press Capture Current Screen button. Then it will capture the current screen and saves it as BMP file.