
Specifications
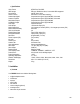
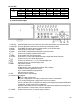


DVR16M 9 GB
5) DWELL TIME Set-Up
1. Press"or!to choose DWELL TIME and the ENTER button to open the menu.
2. Press"or!to set the dwell time (period each channel is sequentially shown on the monitor): 01~10 SEC.
3. Press MENU to confirm the current set-up and return to the previous menu.
4. Press MENU again to exit and close the system set-up menu.
6) MESSAGE LATCH Set-Up
The user can decide whether or not the External Alarm
and Video Loss graphs should appear on the monitor.
1. Press"or!to choose MESSAGE LATCH and the ENTER button to open the menu.
2. Press"or!to set MESSAGE LATCH: ON/OFF.
3. Press MENU to confirm the current set-up and return to the previous menu.
4. Press MENU again to exit and close the system set-up menu.
7) TITLE DISPLAY Set-Up
1. Press"or!to choose TITLE DISPLAY and the ENTER button to open the menu.
2. Press"or!to set TITLE DISPLAY (if the title of a channel should appear on the monitor): ON/OFF.
3. Press MENU to confirm the current set-up and return to the previous menu.
4. Press MENU again to exit and close the system set-up menu.
8) TIME DISPLAY Set-Up
1. Press
"
or
!
to choose TIME DISPLAY and the ENTER button to open the menu.
2. Select a format with"or!: Y-M-D, M-D-Y, D-M-Y (D=day ; M=month ; Y=year) or OFF (time is not displayed).
3. Press MENU to confirm the current set-up and return to the previous menu.
4. Press MENU again to exit and close the system set-up menu.
9) TIME Set-Up
1. Press"or!to choose the date and time indication and the ENTER button to open the menu.
2. Press
"
or
!
to change the value and
#
or
$
to move to the previous or next value.
3. Press MENU to confirm the current set-up and return to the previous menu.
4. Press MENU again to exit and close the system set-up menu.
10) Change Password (default password : 0000)
1. Press"or!to choose 'New password' and the ENTER button to open the password menu.
2. Press"or!to change the value and #or$ to move to the previous or next value.
3. Press MENU to confirm the current set-up and return to the previous menu.
4. Press MENU again to exit and close the system set-up menu.
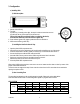
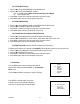
11) CLEAR HDD Yes / No Set-Up
1. Press"or!to choose CLEAR HDD and the ENTER button.
2. Press"or!to set CLEAR HDD: MASTER or SLAVE.
3. Press ►or ◄ to choose between Yes and No:
Yes: press ►to clear the HDD.
No: press◄ NOT to clear the HDD.
4. Press MENU to confirm the current set-up and return to the previous menu.
5. Press MENU again to exit and close the system set-up menu.
All Data in HDD
Will Be Cleared
Are you sure?
(◄: No ►: Yes)