
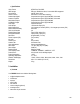
Specifications
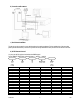


DVR16M 5 GB
PAL SYSTEM
IPS 12A 12 6 3 2 1
Best 48hr 100hr 202hr 406hr 608hr 1216hr
High 60hr 126hr 254hr 506hr 760hr 1520hr
Normal 98hr 202hr 406hr 810hr 1216hr 2440hr
rec.
quality
Basic 162hr 336hr 676hr 1350hr 2026hr 4050hr
HDD type 240GB
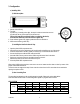
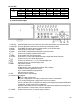
b) Control Panel Description
1. HDD trays: behind the plastic door are the 2 HDD trays. Unlock them and pull them out to insert the HDDs.
2. Select keys: press the appropriate camera select key to select the corresponding camera.
3. MENU: Press MENU and enter the password (default: 0000) to access the main menu.
4. ENTER: Press ENTER to confirm data or a selection.
5. ZOOM: Press ZOOM to enlarge the picture displayed on the main monitor.
6.
: Press this key to display a picture-in-picture screen.
7. SLOW: Press SLOW to slow down the play speed.
8. SELECT: Press SELECT and one of the channel select keys to display that channel full screen.
9.
: Press this key to go to 4 channel display mode.
10.
: Press this key to switch to 7, 9, 10 or 13 channel display mode.
11.
: Press this key to go to 16 channel display mode.
12. LEDs: HDD: HDD is activated
HDD FULL: HDD is full
ALARM: alarm is armed (when alarm is triggered, LED is flashing)
TIMER: the device is programmed to record
PLAY: recorded material is being reproduced
REC: the device is recording
13. REC: Press this button to start recording.
14. Controls for video playback
: PLAY: to play recorded video.
!/Down: to stop playback or recording. In setup mode it works as a down button.
"
/Up: to pause the fragment. In setup mode it works as an up button.
#
/Left: to rewind in PLAY and PAUSE mode. Speed can be adjusted by pressing the REW button
several times. In setup mode it works as a left button.
$/Right: to wind forward in PLAY and PAUSE mode. Speed can be adjusted by pressing the FW
button several times. In setup mode it works as a right button.
15. POWER: Press this button to power on, and press again to power off.