
Specifications
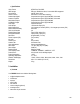


DVR16M 4 GB
3. Configuration
a) Installing HDD
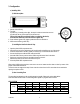
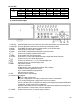
1) HDD Description
1. Handle of the HDD tray
2. Tray lock:
In position A (cf. drawing on the right), the tray is locked and cannot be removed.
In position B, the tray is unlocked and can be removed.
The key lock must be in position A before you switch on the device,
if not the hard disk drive cannot be used in a regular way.
3. Power indicator (green LED): lights up when the device is switched on.
4. HDD access indicator (yellow LED).
2) Installing the Hard Drive into the Tray
•
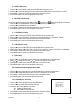
Open the plastic HDD compartment door.
• Unlock the tray lock of the desired tray, pull out the handle and pull the tray out of the device.
• Push the release latch at the left ("OPEN") to slide the top cover backwards and remove it.
•
Connect the DC power cable and IDE cable to the HDD.
• Insert the HDD in the tray and secure the HDD through the screw holes in the sides.
• Put the top cover back on the tray and slide it forward to secure it.
•
Slide the tray back into the device and lock the tray lock.
•
Close the plastic HDD compartment door.
When using 2 HDDs at the same time, make sure to set one as 'master' and the other as 'slave' by means of the
jumper on the HDDs themselves.
This device does not support hot swap. Power down the unit and leave it off for more than 60 seconds before
opening it to replace a HDD.
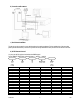
3) Max. Recording Time
The recording time depends on the recording speed and quality. Please refer to the tables below:
Note: these data are the results of a test during which regular TV programs were recorded
NTSC SYSTEM
IPS 15A 15 8 4 2 1
Best 48hr 96hr 180hr 360hr 720hr 1440hr
High 60hr 120hr 226hr 450hr 900hr 1800hr
Normal 96hr 192hr 360hr 720hr 1440hr 2880hr
rec.
quality
Basic 160hr 320hr 600hr 1200hr 2400hr 4800hr
HDD type 240GB