
Specifications


DVR16M 12 GB
d) Timer Programming
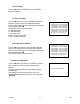
1) Enter "Timer" Menu
Press the MENU button on the front of the device, enter the
password and confirm it by pressing ENTER (cf. "4a: Open Main
Menu" on p. 7)
Press"or!until 'TIMER' is selected (cf. figure on the right).
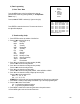
Press ENTER to enter the timer menu. The screen as shown on
the right will be displayed.
2) Timer Recording Set-Up
1. Press ENTER to set the day selection of the first line.
2. Press"or!to select the day set-up:
DAILY : every day
MON : Monday
TUE : Tuesday
WED : Wednesday
THU : Thursday
FRI : Friday
SAT : Saturday
SUN : Sunday
MO-FR : Monday to Friday
SA-SU : Saturday & Sunday
JAN-01 : special date.
OFF : Not activated
3. Press #or$ to select the recording start time (HH:MM).
Press"or!to set the recording start time.
4. Press
#
or
$
to select the recording end time (HH:MM).
Press
"
or
!
to set the recording end time.
5. Press #or$ to select the recording quality.
Press"or!to set the recording quality to BEST, HIGH, NORMAL or BASIC.
6. Press #or$ to select the number of images per second (IPS).
Press"or!to set the number of IPS:
NTSC : 1, 2, 4, 8, 15, 15A
PAL: 1, 2, 3, 6, 12, 12A
REMARK: Recording quality and format are determined in the 'Record' menu (see below).
7. Press MENU to confirm current settings and ENTER to go to the next programming line.
8. Press"or!to select 'Timer Enable'
Yes: to activate the programmed settings.
No: to ignore the programmed settings.
9. Press MENU to confirm the current set-up and return to the previous menu.
10. Press MENU again to exit and close the Timer menu.
(Menu)
SEARCH
► TIMER
RECORD
CAMERA
SYSTEM
EVENT
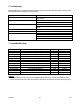
(TIMER)
DAY START END QUALITY IPS
DAILY 00:00 00:00 BEST 15A
DAILY 00:00 00:00 BEST 15A
DAILY 00:00 00:00 BEST 15A
DAILY 00:00 00:00 BEST 15A
DAILY 00:00 00:00 BEST 15A
DAILY 00:00 00:00 BEST 15A
DAILY 00:00 00:00 BEST 15A
TIMER ENABLE: NO