
Operating instructions


Follow these steps carefully in order to ensure correct installation.
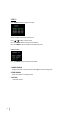
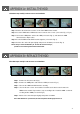
Step 1 Remove the lid and unscrew the screws from HDD bracket module .
Step 2 Insert the HDD into the HDD bracket and screw the four screws. (refer to the Fig. 1, Fig. 2).
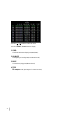
Step 3 Connect the HDD power cable to the HDD (refer to the Fig. 3), and attach the HDD
connector to the 40-pin cable,
Step 4 Screw the HDD and the DVR machine together (refer to the Fig. 3).
Step 5 Pull the sides of the lid apart slightly and push the lid down (refer to the Fig. 4).
Note: Do not try to retrieve the HDD data by PC. The video file cannot be read by PC,
operation on PC would damage the FAT table of the harddisk.
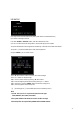
Step 1 Remove the lid (refer to the Fig 1).
Step 2 Remove the HDD power cable from the HDD (refer to the Fig. 3).
Step 3 Take out the HDD from DVR machine carefully.
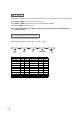
Step 4 Unscrew the four screws connected the hard drive to the bracket and remove the
HDD bracket module.Repeat those steps according to the “Install the HDD” section for
resetting another HDD (refer to the Fig 4).
Step 5 Pull the sides of the lid apart slightly and push the lid down.
Note:When HDD works for a period of time, the surface temperature will be high, please notice it.
Follow these steps carefully in order to ensure correct installation.
APPENDIX A– INSTALL THE HDD
APPENDIX B– REPLACE THE HDD
Fig. 1
Fig. 2
Fig. 3
Fig. 4 Fig. 5
Fig. 1
Fig. 2
Fig. 3
Fig. 4 Fig. 5
34