
User`s manual


22
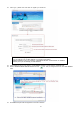
z As far as TCP/IP connectivity is concerned only 4 entries need to be made:
- IP address: Input the IP address that you assigned the DVR. As in the above example I would input the private IP
address of 192.168.0.105.
- Port: 50000(this has to match what is configured in the router and in the DVR).
- User ID: (always leave the default ‘admin’).
- Password: this must match what is configured in the DVR [4,8,16 channel default : Blank (NO PASSWORD)]
REMOTELY:
z To access the DVR remotely, that is from outside your local network, follow the above directions for accessing locally,
except for the IP address. For CASE A, you have received a static IP from your Internet provider. That static IP address
is what you must enter into the software for connectivity to take place (NOT the IP of the DVR). Contact your provider if
you have misplaced the forms stating your static IP address. Since you are accessing the DVR via a router, you must
enter the router’s WAN IP address which is the exactly the same as the static IP that you have received from your
Internet provider.
8.3 CASE B: SINGLE STATIC IP DIRECTLY CONNECTED TO THE DVR
Configure the DVR as follows:
z Set the DVR to MANUAL for the TCP/IP settings. Do not use DHCP SETUP for this application or verify that DHCP
SETUP is set to MANUAL.
z IP ADDRESS: assign it a public IP address (ex: 24.106.1.195).
- You need to assign the DVR an IP address just as you would a PC.
- The static IP address that you received from your Internet provider is the address that you will assign this DVR, if you
do not know this IP address please contact your provider.
- When configuring the DVR’s IP address information, the version of firmware within the units may display the IP
addresses differently. For simplicity sake, 24.106.1.195 may have to be configured as 24.106.001.195.
z PORT NUMBER: 50000.
- 4 channel, 8 channel & 16 channel : This number is stated explicitly.
- For most situations, please use the default 50000 for simplicity.
z SUBNET MASK: 255.255.255.240 (example)
- Along with your static IP address you should have received your subnet mask from your Internet provider. Please use
that subnet mask when configuring the DVR. If you did not receive this information contact your service provider.
z GATEWAY: 24.106.1.193(example).
- Along with your static IP address you should have received your gateway or default gateway from your Internet
provider. Please use that gateway when configuring the DVR. If you did not receive this information contact your
service provider.
z Please DO NOT configure MAC ADDRESS or DHCP SETUP.
z Your DVR is now ready for access.
Accessing the DVR using the Remote Software for CASE B
LOCALLY:
z You cannot physically access the unit locally since a router was not used in this case.
REMOTELY:
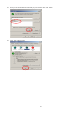
z To access the DVR remotely, open the remote viewing software and click on the ‘Settings’ button. As far as TCP/IP
connectivity is concerned only 4 entries need to be made:
z For CASE B, you have received a static IP from your Internet provider. That static IP address is what you must enter
into the software for connectivity to take place (this should be the same IP address configured in the DVR). Contact
your provider if you have misplaced the forms stating your static IP address. As in the above example I would input the:
- Public IP address of 24.106.1.195.
- Port: 50000(this has to match what is configured in the DVR).
- User ID: (always leave the default ‘admin’).
- Password: this must match what is configured in the DVR [4,8,16 channel default: Blank (NO PASSWORD)]
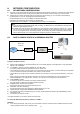
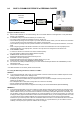
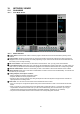
DVR
Internet
(ISP)
Modem
Phone line
Or CATV