
User`s manual


21
8. NETWORK CONFIGURATION
8.1 DVR NETWORK CONFIGURATION
z Now that you are familiar with the equipment and should be able to identify a router from a modem and a Cat5 network
cable from a telephone cable, we will proceed to determine the network scenario that fits your current network.
z Please call your provider to identify what type of service they are providing you. You will need to know following ;
- Upload speed: For your own knowledge for expected frame rates.
- Download speed: For your own knowledge for expected frame rates.
- Addressing: For determining what scenario you should follow.
- Router On Site or Just a Modem – For determining what scenario you should follow.
8.2 CASE A: SINGLE STATIC IP w/PERSONAL ROUTER
Configure the DVR as follows:
z Set the DVR to MANUAL for the TCP/IP settings. Do not use DHCP SETUP for this application or verify that DHCP
SETUP is set to MANUAL.
z IP ADDRESS : assign it a private IP address (ex: 192.168.0.105)
- You need to assign the DVR an IP address just as you would a PC.
- The IP address you assign must be unique to your local network as well as “match” your local network. For information
on how to choose a unique IP that matches your network, consult the FAQ.
- The IP address you assign must be a private IP address. For information on what a private IP address is, consult the
FAQ.
- When configuring the DVR’s IP address information, the version of firmware within the units may display the IP
addresses differently. For simplicity sake, 192.168.1.105 may have to be configured as 192.168.001.105.
z PORT NUMBER : 50000
- 4 channel, 8 channel & 16 channel: This number is stated explicitly.
- For most situations, please use the default 50000 for simplicity.
z SUBNET MASK: 255.255.255.0 (example)
- Assign the DVR the same exact subnet mask as your PC.
z GATEWAY: 192.168.0.1(example)
- Assign the DVR the same exact gateway (or default gateway) as your PC.
z Please DO NOT configure MAC ADDRESS or DHCP SETUP.
z You will need to forward port 50000 through your router. Please forward port 50000 to the IP ADDRESS you have
assigned the DVR.
z Your DVR is now ready for access.
* For detail information on the above, please consult the FAQ.
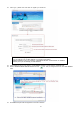
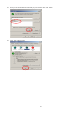
Accessing the DVR using the Remote Software for CASE A
LOCALLY:
z To access the DVR locally, that is from your local network on site from where the DVR is installed. Open the remote
viewing software and click on the ‘Settings’ button.
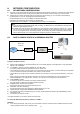
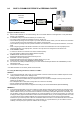
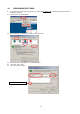
Personal
Router
w / switch
Internet
(ISP)
Modem
Phone line
Or CATV
PC
DVR
(Note)
(1) If your provider is using PPPoE (usually DSL providers), you MUST have a router installed on site and follow
CASE C for DVR setup and access.
(2) PLEASE verify Internet access after installing any new equipment (routers, switches, modems, etc.). If possi
ble, use a PC on the network to verify that an Internet connection can be made and that all current configurat
ions on any equipment are up and working properly. Do this before doing ANY configurations with the DVR.
We are assuming that your current equipment is configured properly fo
r
Internet access.