
User`s manual


20
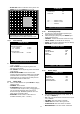
7.7 PTZ CAMERA CONTROL
z Press PTZ key first for PTZ control mode. Channel
buttons from 1 to 16 and ▲▼◀ ▶ keys are assigned
for each PTZ command, and user can control PTZ
camera connected to DVR unit by pressing any one of
those 20 buttons, one after the other, as needed, and
it is just like control by separate PTZ controller.
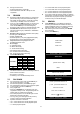
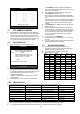
7.8 DATA BACK-UP
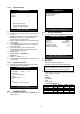
z Enter into BACK-UP > CD-R SETUP menu.
z Insert empty CD-R media into CD writer and select
the start time & date from which you want to back up.
- The START & END time / date in HDD sub-menu only
shows start and end of recording. This is not
selectable and editable.
- 700MB on CD-R sub-menu represent size of CD-R
media inserted.
z To set start time of back-up and back-up data size,
press ENTER key first on [START] or [SIZE] sub-
menu and adjust using [+] [-] keys and move using
◀
▶
keys for next change.
z After setting the time/date and back-up data size,
press ENTER key again to exit.
- End of back-up time will be calculated automatically
as per start time & date and the back-up data size you
set.
- User can select the back-up data size (size of back-up
data from start of back-up) on [SIZE] item but END of
back-up time is automatically determined by DVR
system.
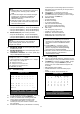
z Press ENTER key on BURN sub-menu. DVR system
starts burning CD.
z When burning is completed, CD-R media will come
out automatically. In the next CD back-up, start time
of CD-R shall be the end time of previous CD back-up,
and you can back-up from that for continuous data
back-up. If you need another backup, repeat the
above procedure.
z To stop backup, press MENU key.
- During burning CD, it’s impossible to cancel burning
process.
z User can verify the back-up CD on PC with BACK-UP
CD PLAYER (Included in Package).
7.9 RS-232C ASCII CODE
z Following ASCII-Codes (Hexa-Code) are for
programmers who want to control DVR unit via the
RS232C Port using keyboard of PC.
z The following table is based on 16ch DVR.
z All ASCII-Code is 1 Byte.
REC ‘R’ PTZ ‘T’ CH6 ‘6’
STOP ‘S’ ZOOM ‘Z’ CH7 ‘7’
PLAY ‘P’ FRZ ‘F’ CH8 ‘8’
PAUSE ‘A’ MODE ‘D’ CH9 ‘9’
SERCH ‘E’ PIP ‘I’ CH10 ‘0’
MENU ‘M’ SEQ ‘Q’ CH11 ’!’
UP ‘U’ J.SHU ‘L’ CH12 ’@’
DOWN ‘J’ KLOCK ‘C’ CH13 ’#’
LEFT ‘H’ QPLAY ‘Y’ CH14 ’$’
RIGHT ‘K’ CH1 ‘1’ CH15 ’%’
NEXT ‘N’ CH2 ‘2’ CH16 ’^’
ENTER 0x0d CH3 ‘3’
-
‘<‘
CH4
‘4’
+
‘>’ CH5 ‘5’
7.10 JOG/SHUTTLE
z Jog / Shuttle: Please input ‘L’ command to activate J/SHUTTLE function using keyboard of PC.
Shuttle Right 10 degree "&<1"[enter] Shuttle Left 10 degree "&>1"[enter]
Shuttle Right 20 degree "&<2"[enter] Shuttle Left 20 degree "&>2"[enter]
Shuttle Right 30 degree "&<3"[enter] Shuttle Left 30 degree "&>3"[enter]
Shuttle Right 40 degree "&<4"[enter] Shuttle Left 40 degree "&>4"[enter]
Shuttle Right 50 degree "&<5"[enter] Shuttle Left 50 degree "&>5"[enter]
Shuttle Right 60 degree "&<6"[enter] Shuttle Left 60 degree "&>6"[enter]
Shuttle Right 70 degree "&<7"[enter] Shuttle Left 70 degree "&>7"[enter]
Shuttle Left 80 degree "&>8"[enter]
Jog Minus "&-"[enter] Jog Plus "&+"[enter]
z Shuttle: After inputting a command once, it will keep performing the command until next command.
z Jog: It makes the stage staying after one time operation by command input like Button operation.
-- : -- : --
-- : -- : --
-- : -- : --
-- : -- : --
-- : -- : --
-- : -- : --
-- : -- : --
-- : -- : --
---- / - -/ --
---- / - -/ --
---- / - -/ --
---- / - -/ --
---- / - -/ --
---- / - -/ --
---- / - -/ --
---- / - -/ --
----
----
----
----
----
----
----
----
--
--
--
--
--
--
--
--
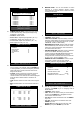
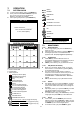
TIME / DATE EVENT 001/000 CH
E
V
ENT LIST
SEARCH : [ENTER] , EXIT : [MENU]
SELECT: ▲▼, PAGE: + -
CD-R SETUP
HDD
[START] 2005/AUG/07 AM04:04:12
[ END ] 2005/AUG/08 PM08:12:23
CD-R 700 MB
[START] 2005/AUG/07 AM04:04:12
[ END ] 2005/AUG/08 PM08:12:23
[ SIZE ] 700 MB - > 700MB
BURN
CD-RW BURNING: IMAGE DATA.
EXIT : [MENU]