High Performance Plug and Play 16-bit Ethernet Adapter NXP-16 USER'S GUIDE Part #MAN107 Rev. 1.
Contents Section One - Introduction ......................... 1 Section Two - Installation ........................... 2 Section Three - Driver Installation .............. 8 Section Four - Troubleshooting .................. 8 Section Five - Cable Information ............. 10 Section Six - Specifications ..................... 10 Section Seven - Technical Support .......... 11 Section Eight - Notices .............................
Section Two - Installation This section provides step-by-step instructions on how to install your new network adapter. Installation of this network adapter is a two-step process consisting of actual hardware installation and card configuration. This network adapter is designed to be configured by the Plug and Play capabilities of the host computer/operating system. Also, the adapter can be installed and configured in a legacy system by using the setup program (SETUP.EXE) included on the driver diskette. 2.
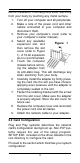
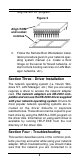
before installation. Discharge any static electricity from your body by touching any metal surface. 1. 2. 3. 4. 5. 6. 7. 8. 9. Turn off your computer and all peripherals. Make a note of the power cord and other cables connected to your computer and disconnect them. Remove your computer’s cover (refer to your computer’s owner manual). Select any available Figure 1 expansion slot, and then remove the slot cover (refer to Figure 1). A 16-bit expansion slot is recommended.
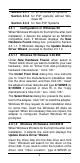
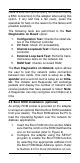
Section 2.3.1 for all Windows 95 systems Section 2.3.2 for PnP systems without Windows 95 Section 2.3.3 for Non-PnP Systems 2.3.1 Configuration in Windows 95 When Windows 95 starts for the first time after card installation, it detects the adapter as an NE2000 compatible card. If Windows displays the New Hardware Found dialog box, proceed to Section 2.3.1.1. If Windows displays the Update Device Driver Wizard, proceed to Section 2.3.1.2. 2.3.1.1 Windows 95 Release 4.00.
B:\WIN95) in the entry box and click “OK”. Click “Finish.” Windows 95 may request its own installation disks or CD for some files. Insert the Windows 95 disks or CD as required. When all necessary files are copied, the adapter is configured. Restart Windows 95 as prompted. 2.3.2 Configuration in PnP Systems without Windows 95 If the card is installed in a PnP system without Windows 95, the system assigns the card an I/O Base Address and IRQ. Run SETUP.
For more information on running SETUP, refer to the file README.TXT in the root directory of the driver diskette. The following configuration options are available in the SETUP Main Menu: • • • View Current Configuration Setup Run Diagnostics View Current Configuration displays the current settings of the card. The Setup option allows user selection of parameters such as Operating Mode, Medium type, FullDuplex Enable/Disable, I/O Base Address, Interrupt, and Boot ROM Address.
cable is attached (and properly terminated if using a BNC connection) to the adapter when using this option. If any test has a fail count, press the spacebar for help on the reason for the failure and possible solutions The following tests are performed in the Run Diagnostics on Board option: 1. 2. 3. 4. 5. Configuration Test: Checks the initial status of the Ethernet controller I/O Test: Check I/O accessibility Internal Loop back Test: Checks adapter's controller.
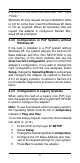
ning the SETUP program. Figure 2 Align ROM and socket notches 3. Follow the Remote Boot Workstation installation procedure given in your network operating system manual (i.e. create a Boot Image on the server for Novell networks, or start remote booting services on LAN Manager networks, etc.). Section Three - Driver Installation The network operating system (i.e. Novell, Windows NT, LAN Manager, etc.) that you are using requires a driver to access the network adapter card.
functioning. If you suspect that the adapter is malfunctioning, replace it with another adapter which is known to function properly. Also try the adapter in another computer. This can determine whether the adapter or computer causes the problem. If you cannot resolve your difficulty after reading the following information, contact your dealer or vendor for assistance. Most adapter failure after installation is caused by A) I/O base address and IRQ Line conflict, or B) Cable problems. 4.
nators. If the terminators do not measure 50 ohms +/- 1%, replace the terminator. Measure the coaxial cable with a 50-ohm terminator attached to one end. The total resistance of the cable plus the terminator should be no more than a few ohms more than the terminator alone. Section Five - Cable Information The network adapters support both popular cable schemes used in Ethernet networks: 10Base-T and 10Base-2. The following are the recommended specifications for proper network cabling.
I/O address: 200, 220, 240, 260, 280, 2A0, 2C0, 2E0, 300, 320, 340, 360, 380, 3A0, 3C0, 3E0 IRQ line: 2 (9), 3, 4, 5, 10, 11, 12, 15 RAM buffer: 16 KB Boot ROM address: C000, C400, C800, CC00, D000, D400, D800, DC00 Power Consumption: 2.5 W Temperature: 0 to 55 degrees C (Operating) Humidity: 10% to 90% (Non condensing) Dimensions: 6.39" x 2.48" Certification: FCC Part 15 Class B Drivers: Novell NetWare 3.x, 4.
World Wide Web - www.maxcorp.com Email - support@maxcorp.com FTP - ftp.maxcorp.com Section Eight - Notices 8.1 Five Year Limited Warranty MaxTech warrants to the original buyer of this product against defects in material and workmanship for five years from the date of purchase. During the warranty period, MaxTech will repair (or at its option, replace) the product that proves to be defective, provided the product has not been abused, misused, modified, or repaired by an unauthorized center.
the unit by any unauthorized service center. This warranty is voided if the product has been abused, misused, modified, or repaired by an unauthorized service center. 8.2 FCC Class B Statement This equipment has been tested and found to comply with the limits for a Class B digital device, pursuant to Part 15 of the FCC Rules. These limits are designed to provide reasonable protection against harmful interference in a residential installation.
document in any form is allowed without written permission from the manufacturer. First Edition GZ/DR - Version 1.
15