
Specifications


11921 Slauson Ave. Santa Fe Springs, CA. 90670 (800) 227-4116 FAX (888) 771-7713
97
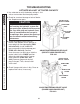
4. Make sure platform is on the ground. Check
the fl ow control valve as follows. Remove
fl ow control valve (FIG. 97-1). Ensure the
fl ow control valve operates with a smooth
spring-loaded action. Check for debris inside
the valve. Clean or replace the fl ow control
valve, if necessary. Reinstall fl ow control
valve (if good) or a replacement.
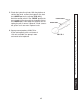
5. Check the lowering solenoid valve as follows.
Check if fi ltering screen is plugged. Clean
carefully if required. Push on the plunger in
the valve by inserting small screwdriver in the
open end (FIG. 97-2). If the plunger does not
move with a smooth, spring-loaded action (ap-
proximately 1/8”), replace the valve cartridge.
Reinstall lowering solenoid valve (if good) or
a replacement. Torque valve cartridge to 30
lbs.-ft. and hex nut to 30 lbs.-in.
To prevent damage to fl ow control
valve, do not disassemble the valve.
CAUTION
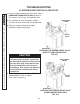
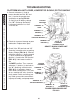
CHECKING SOLENOID VALVE
FIG. 97-3
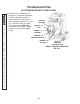
FLOW CONTROL VALVE ON BACK OF
POWER DOWN PUMP ASSEMBLY
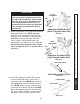
FIG. 97-2
FLOW CONTROL
VALVE
Keep dirt, water and other contaminants
from entering the hydraulic system. Before
opening the hydraulic fl uid reservoir fi ller
cap, drain plug and hydraulic lines, clean
up contaminants that can get in the open-
ings. Also, protect the openings from acci-
dental contamination during maintenance.
CAUTION
VALVE CARTRIDGE
1/8”
FLOW CONTROL VALVE ON BACK OF
GRAVITY DOWN PUMP ASSEMBLY
FIG. 97-1
FLOW
CONTROL
VALVE