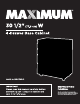
(77.6 cm) w 4-Drawer Base Cabinet IMPORTANT INSTRUCTION Please read this manual carefully before MANUAL assembling and using this cabinet and Dus to continuing Improvements, " the actual product may differ slightly save it for reference farm the product described herein.
model no. 068-7096-0 | contact us: 1-888-670-6682 TABLE OF CONTENTS SAFETY EXPLODED VIEW / PART LIST COORDINATING PRODUCTS TABLE OF CONTENTS NOTE If any parts are missing or damaged, or If you have any questions, please call 1-888-670-6682 and have the product number, cash register receipt and the date of purchase available when you call. DO NOT SHIP YOUR PRODUCT BACK TO THE STORE, UNLESS WE SEND YOU WRITTEN INSTRUCTIONS FOR RETURN.
SAFETY To reduce the risk of serious injury, read and follow the safety instructions below before assembling and using this product. ® This product is intended for indoor use only. ® This product Is not designed for commercial nor Industrial usage. ® Neap the product on level surfaces. The product could become unstable and it may tip over if stored or moved on an uneven surface, which may cause personal Injury, death or product damage.
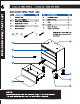
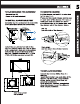
model no. 068-7096-0 | contact us: EXPLODED VIEW / PART LIST CADETTE T 1 Wood Top Drawer Liner 4 7 slide (left) 4 Adjustable Foot 2 key 2 : able Foo! . g Thai 5 e (rig! Hex 2 5 Screwdriver +NOTE: One extra M6 x12 O O G/ Phillips pan head screw Is provided. Tapping Screw EXPLODED VIEW / PART LIST Replacement keys may be ordered. Call our toll-free number. The code which appears on the lock will be required.
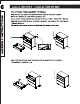
TOOLS REQUIRED FOR ASSEMBLY * Screwdriver (5) Power drill (not Included) TO INSTALL ADJUSTABLE FEET Carefully lay the cabinet on its back with a soft mat underneath for protection. Install the adjustable feet (3) to the cabinet bottom. Make sure the A sides of the adjustable feet are facing either towards the back or the front of the cabinet. Tighten securely with 16 PCS Phillips pan head screws (2). Front view from under the cabinet TO REMOVE DRAWER Pull the drawer out until it is extended to the maximum.
ASSEMBLY INSTRUCTIONS model no. 068-7096-0 | contact TO ATTACH THE CABINET TO WALL Remove the top drawer (as Instructed on page 5) from the cabinet. Place the cabinet on a flat floor against a wall. Use a power drill to attach the cabinet to the wall with 2 PCS hex tapping screws (10) through the holes along the top edge of the back panel. Tighten securely. For safety, the screws shall be drilled Into the studs of the wall. Install the top drawer back (as instructed on page 5) to the cabinet.
COORDINATING PRODUCTS This product coordinates well with the units below to offer a best storage solution. They can be combined into various combinations to meet different storage requirements. 30 1/2" (77.6 cm) wall cabinet 068-7099-4 301/2" (77.8 cm) shelf 068-7303-8 301/2" (77.6 em) 2-door cabinet 068-7095-2 30172 (77.6 cm) peg board 068-7304-6 361/2" (77.6 cm) drawer cabinet 068-7096-0 301/2" (77.6 cm) tal 068-7097-8 cabinet 42" (106.
LIMITED WARRANTY This product Is guaranteed for 1 year from the date of original retell purchase against defects In materials and workmanship. Subject to the conditions and limitations described below, this product, If returned to us with a proof of purchase within the stated warranty period and if covered under this warranty, will be repaired or replaced (with the same model, or one of equal value or specification), at our option.