
Installation Sheet

White Wires
(Neutral)
Black Wires
(Live)
Green wire
(Ground)
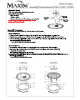
Assembly Instructions
This fixture can be installed in either a 3” Outlet Box (1) or 4” Outlet box (2)
For 4” Outlet box
1. Attach fixture to outlet box by the Key Holes (4) with the screws (3) on the outlet box
2. Tighten Screws (3) on the outlet box from the opposite side (PCB/LED side) to secure fixture
3. Attach Metal Ring (8)/Diffuser (9) set to the fixture by setting the Lips (10) of Plastic Diffuser (9)
onto the Slot Hole (6) of the fixture. onto the Slot Hole (6) of the fixture.
- Turn COUNTER CLOCKWISE to secure
For 3” Outlet box
1. Insert Driver into the outlet box until the Die Cast part (7) is flush with the ceiling.
2. Set Screw (3) on Hole (11) on the PCB/LED board and tighten with Screw Driver (12)
- Repeat for the other hole
Note: Hole (11) is aligned with Key Hole (5)
3. Attach Metal Ring (8)/ Diffuser (9) set to the fixture by setting the Lips (10) of the Plastic Diffuser (9) onto the 3. Attach Metal Ring (8)/ Diffuser (9) set to the fixture by setting the Lips (10) of the Plastic Diffuser (9) onto the
Slot Hole (6) of the fixture.
- Turn COUNTER CLOCKWISE to secure
Electrical Wiring
With wire connectors, connect power cords
from outlet box to fixture.
- Black to Black
- White to White
- Green to Ground or to Green Screw on backplate
Please consult a qualified Electrician if you are not Please consult a qualified Electrician if you are not
familiar with electrical wiring