
Assembly Instruction

Page 2 of (2)
IMPORTANT: Turn off the power at the main fuse or circuit breaker box before starting installation.
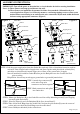
Notes: 1>These fixtures can hang up and down to the wall;
2>These fixtures are intended to be mounted in either of two methods: i.Mount directly to a
secured outlet box.(Figure 1)or ii.Directly mount to a wall using tapping screws or other secure
method.When not mounting to an outlet box,the wire connections maybe made within the fixture
inclosure using appropriate connectors.(Figure 2)
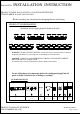
ASSEMBLY INSTRUCTIONS:
H
STEP 2: Attach wire connectors(H)
to the wires.Tape wire
connectors and wires together.
STEP 3:Push connections and splices
into Outlet box .
Figure 1 Figure 2
Outlet Box
Anchor
Wire Connector
Tapping Screw
Mounting
Screw
Back Plate
Fitter
Acorn
Nut
Glass
Nord
Ring
Bulb
(not included)
Conduit
Anchor
Tapping Screw
Wire Connector
Back Plate
Fitter
Glass
Acorn
Nut
Nord
Ring
Bulb
(not included)
STEP 1: Pull the power supply wires from the Outlet Box ,and strip 3/4in. of insulation from wire ends for
each wire.Twist stripped ends of supply wires and fitter together with pliers,black to black(Live)
and white to white(neutral).Attach copper wire of fitter to the ground wire of supply.
Notes:if installation is without Outlet Box,first put the Backplate onto the Conduit and fix it
prior to wiring.
Helpful hint: if necessary,attach copper ground wire to grounded junction box.
STEP 4: Mount the Backplate (B) to the Outlet Box and the wall by Mounting screws(G) and Tapping
screws(F) with Anchors(E).
STEP 5: Place the Fitter(A) over the Backplate(B) by 2pcs Acorn Nuts(C).
STEP 6:Take off the Nord Rings from the socket bases and put the glass shades(D) onto the screws of
socket and screw back the Nord Rings onto the socket bases.
STEP 7:Screw Bulbs(not inlcuded) in the socket bases.