
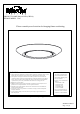
Installation Sheet

2.)
1.)
3.)
IMPORTANT: Turn off the power at the main fuse or circuit breaker box before starting installation
Locate all hardware & components before discarding packaging
Cleaning & Care:
Page 2 of (2)
Clean with soft cloth and a mild detergent.
Do not use abrasive cleaner.
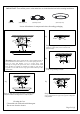
(B)Mouting screws
(A)Wire Nuts
(C)Mouting bracket
(D)The lamp body
Step 1.
Bring positive, neutral, and ground supply
conductors (120V, 60Hz) to the room side from
junction box(E).
E
Step 2.
Mount the mounting bracket (C) to the junction
box(E), using mounting screws(B)
.
Step 3.
Connect black fixture wire to positive, white fixture
wire to neutral,and bare copper wire to ground
using wire
nuts provided
.
4.)
Step 4.
Align fixture spring with cutout in mounting strap
and press towards mounting surface to snap into place
.
Mounting:
These fixtures mount directly to most standard metallic &
non-metallic electrical boxes with 2-3/4" to 3-1/2" hole spacing that are at
least 1-1/2" deep. This includes 3-1/2" & 4" octagon boxes, round
mud-rings for octagon and square boxes, and 3" & 4"non-metallic round
boxes. Products are suitable for mounting on ceilings or walls, and are
acceptable for use within closet storage spaces when installed per NEC
requirements.
Ground
B
C
E
Ground
Ground
B
A
C
E
Black
Positive
White
Neutral
Ground
Ground
B
A
C
E
Black
Positive
White
Neutral
Ground
Ground
B
A
C
E
Black
Positive
White
Neutral