
Assembly Instruction

CounterMax MX-LD-AC
RECESS/SURFACE
LIGHT
53830-53832-53835-53836
INSTALLATION
INSTRUCTIONS
Installation
RECESSING
SURFACE MOUNTING
Operation
The CounterMax MX-LD-AC Pro LED recessed and surface lights are linkable up to
20 pucks to a single power supply, easy to facilitate custom layouts
Matintenance & Care
Ensure that the power is disconnected prior to cleaning.
To keep the finish of this product, wipe over with soft cloth periodically.
Do not use harsh chemical solvents, it may dis-colour or damage the finish.
Technical drawings for illustration purposes only. CounterMax MX-LD-AC has the right to change any information
without prior notice. Make sure you check all hole cut outs before work commences. Page 2 of 2
1 2
2
3
3
1
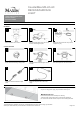
Drill an installation hole of 2-3/8" Ø Feed the attached cables through the cut hole
and fix the recessed light to place.
Making sure the lead wires are not pinched or
crimped in any way.
Fix the collar to the unit using 2 fixing screws Feed the attached cables through the hole on
the collar.
Push the lamp back into the collar as before
4 5
Finally wire the power cord to 120v mains
supply.
Connect the lead wires between multiple
pucks.