
Installation Sheet

stainless steel 18PCS
ASSEMBLY INSTRUCTIONS
NOTE
: Only the technical personnel can be allow to fix and maintain.
IMPORTANT!
Make sure that the power is switch off at the electricity mains supply before commencing work.
FIXING INSTRUCTIONS
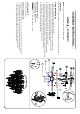
1. Remove the mounting bracket (C) from the canopy (E).
2. Mount ground wire on mounting bracket (C) onto ground screw in the junction box (A).
Firmly connect the mains supply wires to the light fitting using the connectors provided
(B). Ensure that wires are secure and that no bare wire is exposed.
3. Install the mounting bracket (C) to the junction box (A) using the screws (D).
4. Install the canopy (F) to the mounting bracket (C), tighten it using the securing screws (D).
5. Install the stainless stee (G) (When you install the stainless steel of the light,First please install it
from the smaller ring,when the smaller ring all already then install the bigger ring ) .
6. Fit the bulbs into each socket (H) . Do not use bare hands to install.
7. Turn on the power, enjoy your new lighting product.
REPLACEMENT BULB
Do not exceed the maximum wattage.
Light bulbs recommended:
- 7 x Max. 40W 120V G9 Xenon
CLEANING CARE
Clean with a soft dry cloth.
SAFETY INFORMATION
1.Lamp used must in rated voltage ,and do not touch the bulb with bare hands. Always switch
off the electricity supply and allow to cool for 10 minutes before changing the light bulbs.
2. If the external cables have been demaged,Pls change or repair by manufacturer or
service agency or professional electrician,In order to avoid the danger.
stainless steel 9PCS
stainless steel 4PCS
H
G
1
2
3