
Installation Instructions


4
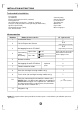
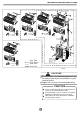
Accessories
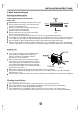
INSTALLATIONINSTRUCTIONS
Note:Excepttheabovepartsprovided,theotherpartsneededduringinstallationyoumust
purchase.
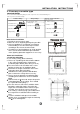
Partsyoumustpurchase
Consultthetechnician
forthepropersize.
6.35
9.53
12.7
6
2
Self-tappingScrewBST2.9X10
Remotecontroller
InstallationPlate
NameofAccessories
Self-tappingScrewAST3.9X25
Seal(forcooling&heatingmodelsonly)
DrainJoint
Magneticring
Transferconnector
()
(Pipesizedifferfromappliancetoappliance.
Tomeetdifferentpipesizerequirement,sometimes
thepipeconnectionsneedthetransferconnector
toinstallontheoutdoorunit.)
NOTE:
Packedwiththeindoorunit
Connecting
pipe
Assembly
Liquidside
PlasticExpansionSheath
Number
Qty/oneunit’
Gasside
7
Remotecontrollerholder
1
(forcooling&heatingmodelsonly)
1
5-8
(dependingonmodels)
5-8
(dependingonmodels)
1
1
1
1-4
(onsomemodels)
1
5
4
9
11
10
8
3
2
1
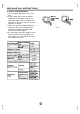
Levelgauge
Screwdriver
Electricdrill,Holecoredrill(65φ mm)
Flaringtoolset
Specifiedtorquewrenches:1.8kgf.m,4.2kgf.m,
5.5kgf.m,6.6kgf.m(differentdependingonmodelNo.)
Spanner(halfunion)
Hexagonalwrench(4mm)
Gas-leakdetector
Toolsneededforinstallation:
Vacuumpump
Gaugemanifold
Usersmanual
Thermometer
Multimeter
Pipecutter
Measuringtape
Optional
parts