
Installation Instructions


15
INSTALLATIONINSTRUCTIONS
1.5m~2m
VP30
Fig.37
Fig.38
Fig.39
Fig.40
Fig.41
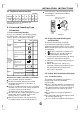
CAUTION
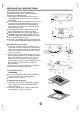
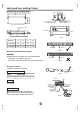
Refertothefiguresontherightfortheinstallation
ofpipes.
Thedrainpipeaswellastheconnectionpartof
indoorunitmustbeheatinsulated,orcondensate
willoccur.
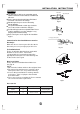
PleaseconnectthepipewithhornyPVCbond
andmakesurethereisnoleakage.
Donotimposethepressureonconnecting
partofdrainpipe.
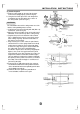
Thegradientdownwardsofdrainpipeshouldbe
over1/100,anddonotbendthedrainpipe.
Pullthedrainpipetransverselywithin20m.Please
installasupporterincasethedrainpipeisvery
longtopreventitfrombending.
LeanDownwardover1/100
SupportingUnit
Fold
Bend
LeanDownward
over1/100
Aslongaspossible(10cm)
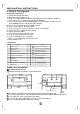
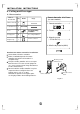
Name Qty. Outline/specification Function
Ductinstallation
board
8 Connectingduct
Fixationbolt(fixing
installationboard)
8
ST3.9×10-F-H
Fixingduct
installationboard
Instructionsforductinstallationaccessories
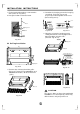
Ductdesign
Fixinstallationboard
Maketheductasshortaspossibleduetothe
lowstaticpressure(nearly0pa)ofthisunit.
Fixtheinstallationboardonductoutletwith
theboltsinaccessories.Iftheboltis
self-provided,thelengthofboltshouldbe
appropriateandmakesurenottodamagethe
insideofunit.SeeFig.30
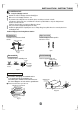
Ductinstallation
Fixtheductoninstallationboardwithrivet.
SeeFig.41.
NOTE:
1.Donotlettheindoorunitbeartheweightofduct.
2.Forconvenientmaintenance,installtheduct
attheplacewhereitiseasytodoremoving.
3.Incasedoinginstallationinmeetingroomor
suchplaces,pleaseequiptheinteriorwith
linerandmuffler.
4.Theseaccessoriesareoptional.Pleasecontact
theserviceforotherrequirement.
Accessories