
Installation Instructions


13
INSTALLATIONINSTRUCTIONS
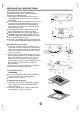
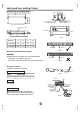
DeterminethelocationofhangingscrewboltfollowingFig.33.
Fig.27
Fig.28
Fig.30
Fig.29
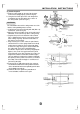
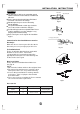
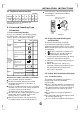
Installationofunit
Install10(4pieces)hangingscrewbolt
φ
Makesuretousethehangingscrewboltof10.
φ
Thetreatmenttotheceilingvariesfromconstruction;pleaseconsulttheprofessionalsfordetails.
1)Treatmenttoceiling---makesuretoconsolidatetheroofbeamforpossiblevibrationtokeeptheceilinghorizontal.
2)Pleasecutofftheroofbeam.
3)Reinforcetheplacethatiscutoffandconsolidatetheroofbeam.
Carryoutconnectionofpipingandwiringinsidetheceiling.
Determinethepipingdirection.Especiallyinthecaseofexistingceiling,pleasepullthewiretotheconnectionplacebefore
overhangingtheunit.
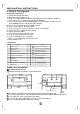
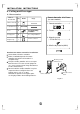
Installthehangingboltinfollowingdifferentsituation:
Timberoverthebeam
(
)
Bladeshape
insertion
()
Slideinsertion
Installwithinsertionorembeddingscrew.
Woodenstructure
Newconcretebricks
Putatimberacrossthebeamsandinstall
thebolts.
Hangingscrewbolts
Ceiling
Roofbeam
Steelbar
(Pipehanging
andembedding
screwbolt)
Originalconcretebricks
Installthehanginghookwithexpansible
boltintotheconcrete.
Steelroofbeamstructre
Installthesupportinganglesteel.
Hangingscrewbolt
Hangingbolts
Supportinganglsteele
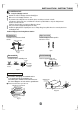
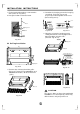
Overhangtheunit
Fig.31
Hangingscrewbolt
Nut(upside)
Installationear
Nut(underside)
Washer(upside)
Washer(underside)
Installthehangingscrewbolttothe
U-shapedslotofinstallationear.
Overhangtheindoorunitandmeasure
theleveldegreeofunitwithagradienter.
Fastenthenut
Gradienter
Fig.32
Fastenandfixtheupsidenut.