
Quick Start Guide


SuperLoader 3 Quick Start Guide
Unpacking the Autoloader 0
Before you begin, clear a desk or table so that you can
unpack the autoloader. You also need to select an open 2U
computer rack location near the server that will host the
autoloader.
Unpack and inspect the autoloader for shipping damage by
doing the following:
1 Clear a table or desk so that you have room to unpack
the autoloader.
2 Inspect the shipping box for damage. If you notice any
damage, report it to the shipping company
immediately.
3 Open the shipping box and remove the accessories
package. Set the accessories package aside for now.
4 Lift the autoloader and padding out of the box and
place it on the work surface, top facing up. Do not set
the autoloader on either end or sides
.
5 Carefully remove the shipping padding from the left
and right sides of the autoloader. Then remove the bag
from the autoloader.
6 Remove the foam insert from the magazine bay of the
autoloader. Save the packing materials in case you
need to move or ship the autoloader in the future
.
NOTE: If the cover must be taken off, there are 26 screws
that need to be removed.
CAUTION: If the room in which you are working differs
from the temperature in which the autoloader was
shipped or stored by 15° C (30° F) or more, let the
autoloader acclimate to the surrounding
environment for at least 12 hours before opening
the shipping carton.
C
AUTION: If your unit was ordered as a one-magazine
autoloader, be sure to remove the plastic shipping
insert from the magazine bay before connecting or
operating your autoloader. Insert either a magazine
or a magazine blank into the bay. The autoloader
will not function without both magazine bays
equipped with either a magazine or a magazine
blank.
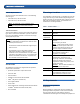
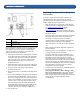
Accessories 0
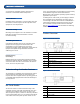
Mounting the Rail Kit 0
For instruction on mounting the autoloader in a standard
19-inch rack, refer to the
Quantum SuperLoader 3 Rack
Installation Quick Start Guide
.
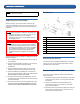
Connecting the SCSI and Power Cables0
To connect the SCSI and power cables to the autoloader,
follow these steps:
1 Shut down and turn off the selected server. Turn off all
attached accessory devices, such as printers and other
SCSI devices.
2 Attach one end of the SCSI cable (included in the
accessory kit) to one of the connectors on the back
panel of the autoloader.
3 Attach the other end of the SCSI cable to the connector
on the SCSI host adapter or to the connector on the
previous device on the SCSI bus.
1SCSI cable
2 SCSI terminator
3 Power cable
4 Quick Start Guide
5 CD (documentation)
6 Magazine blank
7 Bar code labels
8 TORX L-key drivers (T8 and T10)