
Full Product Manual


customerservice@focus-ontools.com
3
1-800-348-5004
INSTALLATION INSTRUCTIONS
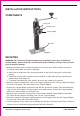
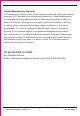
COMPONENTS
Figure A
Crank
Skid Plate
Coupling Tube
Tongue Adapter
Locking Pin
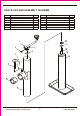
MOUNTING
WARNING! The Trailer Jack Tongue Adapter must be welded in place by a qualified and
certified welder. A poor weld may cause the trailer to fall suddenly, causing serious personal
injury or property damage.
1. Measure the trailer tongue for the best location to mount the Jack. With the trailer mounted on
the towing vehicle hitch, consider the following:
a. Allow room on both sides of the mounting location for the Jack to swing up to its horizontal
position.
b. Check that the Jack will not interfere with the Vehicle or trailer when turning or passing over
speed bumps, boat ramps, etc.
c. To prevent overloading the Jack, attach it as near to the coupler as is practical.
2. Once the location is determined, remove the Tongue Adapter from the Jack by pulling the Locking
Pin from the Coupling Tube and pulling out the Tongue Adapter.
3. Position the Tongue adapter so that the holes will line up with the Coupling Tube holes when the
Jack is in use, then weld the Tongue Adapter to the trailer tongue. Position the Tongue Adapter
holes so the Jack is stable and vertical for use.
4. Raise the Jack so that the Coupling Tube is level with the welded Tongue Adapter, and attach
the Trailer Jack by fitting the Coupling Tube over the Tongue Adapter.
5. Slide the Locking Pin through the appropriate hole in the Coupling Tube and the Tongue Adapter
to secure the Trailer Jack to the trailer tongue.
6. Test the operation of the Trailer Jack by making sure that the Crank lowers and raises it, and that
it locks it into its vertical and horizontal position with the Locking Pin.