
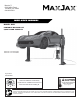
Installation Guide

10
INSTALLATION INSTRUCTIONS
TOOLS REQUIRED
IMPORTANT NOTICE
These instructions must be followed to ensure proper installation and operation of your lift. Failure to comply with these
instructions can result in serious bodily harm and void product warranty. Manufacturer will assume no liability for loss or
damage of any kind, expressed or implied resulting from improper installation or use of this product.
STEP 1
SELECTING SITE
BEFORE INSTALLING YOUR NEW LIFT, CHECK THE FOLLOWING:
1. LIFT LOCATION: Always use architects plans when available. Check layout dimension against oor plan
requirements making sure that adequate space is available.
2. OVERHEAD OBSTRUCTIONS: The area where the lift will be located should be free of overhead obstructions such
as heaters, building supports, electrical lines etc.
3. DEFECTIVE FLOOR: Visually inspect the site where the lift is to be installed and check for cracked or defective
concrete.
4. OPERATING TEMPERATURE. Operate lift only between temperatures of 41° - 104° F (5º - 40 º C).
5. Lift is designed for INDOOR INSTALLATION ONLY.
STEP 2
FLOOR REQUIREMENTS
This lift must be installed on a solid level concrete oor minimum 4" (101mm) thick, compressive strength 3000 psi
(20 MPa) with no more than 3 degrees of slope. FAILURE TO DO SO COULD CAUSE PERSONAL INJURY OR
DEATH.
DO NOT install this lift on any asphalt surface or any surface other than concrete.
DO NOT install this lift on expansion seams or on cracked or defective concrete.
DO NOT install this lift on a second / elevated oor without rst consulting building architect.
DO NOT install this lift outdoors.
• Rotary Hammer Drill or Similar
• 7/8" (22mm) Masonry Bit
• Hammer
• 4 Foot Level (1.5 M)
• Open End Wrench Set: Metric
• Socket and Ratchet Set: Metric
• Hex Key / Metric Allen Wrench Set
• Large Crescent Wrench
• Large Phillips Screwdriver
• Chalk Line
• Medium Phillips Screwdriver
• Tape Measure: 25 Foot (7.5 M) Minimum