
Technical data
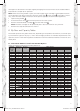


6
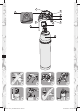
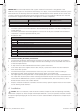
4.1 Assembling the Filter Head, Water Connection
!
Caution: Ensure that the locking handle on the head is open.
A
B
C
D
Close water intake and switch off power supply to the terminal equipment.•
Fit the wall mount •
5
at the intended position.
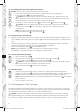
!
Caution: During assembly, note the installation dimensions, bending radii of the
hoses and dimensions of the accessories. The system can be operated vertically and
horizontally. When using the wall mount, install vertically only!
Fit the hoses at the water inlet “IN” •
4
and outlet “OUT”
3
of the fi lter head
1
.
!
Caution: The max. tightening torque at the connections must not exceed 14 Nm!
Check by-pass setting •
10
and, if necessary, adjust to local carbonate hardness
(Chapter 4.2).
Note: The by-pass has been factory set at 30%.
Engage the fi lter head •
1
in the wall mount
5
.
4.2 Setting By-Pass and Capacity
Identify the carbonate hardness of the local water using the MAVEA carbonate hardness test •
(Art. 710800). Alternatively, the local water supplier will provide information on carbonate hard-
ness.
Determine the by-pass setting and capacity according to the application and the carbonate •
hardness identifi ed using the by-pass and capacity tables (Chapter 6).
Then turn the by-pass setting •
10
to the identifi ed value.
Note: Only the PURITY C 0–70% fi lter head has a variable by-pass setting.
The PURITY C 30% fi lter head has a fi xed bypass setting of 30%.
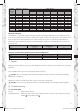
4.3 Inserting the Filter Cartridge
E
F
Remove protective cap •
7
.
Note the next exchange date in the date fi eld on the fi lter cartridge •
6
.
Insert the fi lter cartridge •
6
vertically in the fi lter head
1
.
!
Caution: The fi lter cartridge can only be inserted when the locking handle is open.
Make sure that the fi lter cartridge is positioned correctly.•
Turn the locking handle •
2
until you feel it engage.
4.4 Commissioning
G
H
Open the water intake and switch on the power supply of the terminal equipment.•
Operate the fl ush valve •
8
and fi lter system until the fi ltered water runs clear and without
bubbles. At least the fl ushing volume X must be fl ushed (see table in chapter 3.4).
Note: When bleeding/fl ushing, catch water emerging from the fl ush hose
9
in an appro-
priate container.
Check system for any leaks.•
5 Exchanging the Filter Cartridge
The fi lter cartridge must be replaced after 6–12 months, at the latest 12 months after commission-
ing, irrespective of the level of exhaustion of the fi lter system. If the capacity of the fi lter cartridge
has already been exhausted (Chapter 6), it must be exchanged earlier.
!
Caution: During the exchange, carefully examine all dismantled parts! Faulty parts must be
exchanged and dirty parts should be cleaned. Read the Operating and Safety Information (Chap-
ter 3) prior to exchange. After storage and transport below 0°C (32°F) the fi lter head and fi lter
1001411-001_1001426-001.indd Abs1:61001411-001_1001426-001.indd Abs1:6 02.03.2009 16:41:30 Uhr02.03.2009 16:41:30 Uhr