
Instructions / Assembly

8
Figure 14
Figure 12
Figure 13
A. I, II, III, IV, V and VI button:
These six buttons are used to set the fan speed as follows:
I = minimum speed
II = low speed
III = medium low speed
IV = medium speed
V = medium high speed
VI = high speed
B. button:
This button turns the fan off.
C. Reverse button:
This button is to control fan direction
D. SET code setting button:
Your DC brushless motor is equipped with automatically
learned type remote control and a wall control. If two
fans or more in a house, it is recommended that you not
use the factory code settings. Change codes setting to
any other combination of dip switch setting to avoid fan
interference issues. Please refer the "D" "SET" code
setting button section.
9. PROGRAMMING YOUR
FAN AND OPERATING
THE REMOTE CONTROL
AND WALL CONTROL
Before programming takes place, fan must be fully
assembled and mounted to the ceiling with blades
attached. You must also choose which control you
will be using for programming the fan, the remote
or the wall control. No other wall control should be
used with this fan but that whichwas included. Using
another wall control other than ours will damage your
fan and void your warranty.
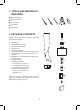
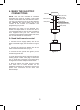
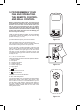
Install one 23A/12V battery (included). To prevent damage
to transmitter, remove the battery if not used for long
periods of time (Fig. 12 & 13).
a) Select desired frequency from the transmitter.
Follow the below steps to set the remote control:
The auto learning function will only mandate within 60
seconds when turning the fan’s AC power ON.
b) From the wall or remote transmitter, Press and hold
“SET” button for about 5 seconds and release. If optional
light kit is installed, the signal light on the wall control
will come on when the button is pressed. The fan has
completed the pairing process with the wall control and
is ready for use.
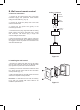
ON ECE
1 2 3 4