
User manual

54
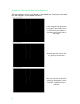
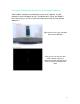
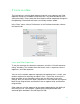
Here you can see the laser lines
when a lighter exposure is selected.
The white and grey blocks don’t
show up, but the blue block has a
nice laser line.
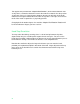
The Best of Two Exposures
To solve the problem in example 5, we must use High Contrast Scanning. It
provides the means to combine the best laser detection from two exposures, so
you can capture more of the object. To use it:
1. Under the Manual Control tab, click
on the Laser Detection tab to start the
laser detection process.
2. Adjust the top Laser Detection
Exposure slider to capture clean laser
lines on the light areas of the object.
When you’re satisfied that you’ve got
the best lines possible, proceed to
step 3.
3. Check the Enable High Contrast
Scanning checkbox, which enables
the bottom Laser Detection Exposure
Two slider.
4. Adjust the Laser Detection Exposure
Two slider for a lower exposure
(usually you’ll be in the -9 to -5 range)
until the dark areas of the model fill in
with a clean laser line. Remember
that the lower value exposures are
brighter, which means they take
longer, so you’ll need to wait a
moment on each to see the results in
the visualization in Laser Line
Detection.
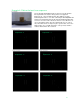
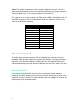
High Contrast Clay Blocks with
Good Exposure (clean, solid line)