
User manual

52
High Contrast Scanning
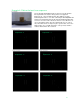
High Contrast Scanning is a method that we developed in order to capture the
best data possible when scanning objects that had more than one Color
present. During development, we discovered that black and white objects or
objects with contrasting Colors were difficult to scan. Exposure tuning for one
Color would mean that areas on the opposite end of the spectrum would scan
poorly or not at all. Rather than require users to only scan objects that were a
single Color, we developed a contrast scanning process that allows for improved
Color detection.
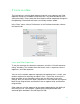
In our automatic settings, this setting is available by clicking on the Multi-
Colored option on the Object Color screen. In Advanced settings, it can be
activated by clicking the “Enable High Contrast Scanning” in the Manual Control
> Laser Detection tab.
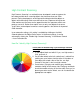
How Do I Identify High Contrast Scanning?
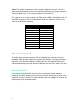
Three rules for determining if you need high contrast
scanning
1. Is your object black and white? If yes, use high contrast.
If no, go to rule 2.
2. On the color wheel to the left, notice there is a black line
splitting one set of colors from the other. If the colors of
your object fall on both sides of the line, use high
contrast. If they don’t, don’t use high contrast.
3. Pastel colors, light grey and medium grey should be
treated as being on the orange side. Dark grey and black
should be treated as being on the blue side. Once you’ve
placed your colors on the wheel, use rule 2 to decide the
appropriate scan option.