
User guide


30
Chapter 4, Configuring Matrox Convert DVI
be deleted or overwritten. The names of presets that cannot be changed or
deleted are prefixed with an asterisk (for example,
*NTSC 4:3).
¦NoteAlthough the industry-standard resolutions for NTSC and PAL are
720×486 and 720×576, the presets for NTSC 4:3 and PAL 4:3 have been
modified to 720×540 and 768×576. This compensates for the square pixels
of a DVI monitor, and ensures that Convert DVI properly displays NTSC and
PAL video.
$ Preset1, Preset2, Preset3, and Preset4 are designed to be overwritten
with your own custom settings (see step 5). You can use keyboard
shortcuts to quickly toggle through any of these four presets (see
“Keyboard shortcuts” on page 31). To overwrite one of these presets, after
you have created your custom region of interest window, click
the icon, type the preset name you want to overwrite (such as
Preset1), and click Yes.
$ You can also add or delete custom presets by using the icons next to the
Region of Interest Preset list. Click to save the current settings as a
preset, or select a preset from the
Region of Interest Preset list, and
then click to delete it.
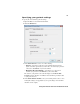
5 Under Region of Interest Settings, select Show selection window to
display the customizable region of interest on your Convert DVI desktop,
and access other selection window settings. You can also press
CRTL+SHIFT+F12 to show/hide the selection window.
$ Select Border color to change the color of the selection window’s border
and bezel. This may make it easier to see the selection window’s border
on darker video clips.
$ Select Show bezel to display the action-safe area (larger dotted line) and
title-safe area (smaller dotted line) of the selection window. This feature is
useful in identifying the areas of your clip that would be hidden by a bezel
when displayed on a standard television screen. The bezel is displayed
only when your selection window has a 4:3 or 16:9 aspect ratio.
$ Select Enable transparency to make the selection window completely
transparent. The selection window border will still be visible on your
Convert DVI desktop.
¦NoteOnly the area within the border will be displayed in your video output.
The border itself will not be visible.
6 From the Lock Aspect Ratio to list, select Custom, 4:3, or 16:9 to make
sure that your selection window maintains your desired aspect ratio,
regardless of the window’s size. Holding down
SHIFT while using your
mouse to resize the window also maintains the window’s aspect ratio.
7 You can adjust the size of the selection window by dragging its borders, and
move the window by clicking anywhere within the window and dragging it