
Instructions / Assembly


4. Measure each position for the mounting holes and mark on the U-channels as per the
selected installation option.
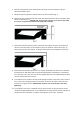
5. Drill 3/16” holes through the U-channel and screen where marked (Fig. 1).
6.
Remove the long U-channels from the screen and drill out the 3/16” holes in the screen ONLY
with a 1/2” drill bit (Fig. 2).
IMPORTANT: These oversized holes are crucial as they allow
the screen to expand and contract with temperature changes.
7. Peel off the protective film from all the U-channels, then replace the side U-channels back
onto the screen and match up the mounting holes in the channels and the screen (Fig. 3).
Push them up to the top U-channel, ensuring that both sides are overlapped the same way.
8. Fit the bottom U-channel to the screen so it overlaps the bottom ends of the side U-channels
the same way on both sides. Drill a 1/8” hole through the back of the bottom U-channel and
the screen only. Then drive one short screw (supplied attached to this label) through the back
of the U-channel and into the screen.
9.
To install the screen, drive the two top screws through the holes in the screen and U-channel
first, so the screen will hang from these two points. Then insert the other screws and drive
them into the support structure.
IMPORTANT: Release each screw by half a turn after
tightening.
10. To test whether the screen is installed correctly, lift the screen up; there should be vertical
movement of approximately 5/16”. If not, release each screw by another half turn until there is
enough movement. Otherwise, re-drill the mounting holes in the screen if required.