
Quick Guide


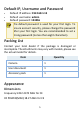

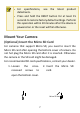


Table Of Contents
- Safety and Compliance Information
- Regulatory Compliance
- FCC statements
- Battery Directive-2013/56/EC
- Default IP, Username and Password
- The default password is used for your first login. To ensure account security, please change the password after your first login. You are recommended to set a strong password (no less than eight characters).
- Packing List
- Appearance
- Mount Your Camera
- The preceding installation process is for concealed installation, during which holes are punched on the wall and cables are penetrated into the wall. If open installation is adopted, cables are not penetrated into the wall but threaded out from the outlet on one side of the base.
- Access Your Camera

8
Wall Mount
You can adopt wall mount or ceiling mount and purchase
hardware accessories by yourself. The following part takes wall
mount as an example. Ceiling mount is similar to wall mount
and therefore is omitted here.
1. Locate the positions of
the holes.
2. Drill holes on the wall.
3. Mount the plastic rivets
of self-tapping screws.
4. Screw
the locknut to
loosen the universal
joint before attaching
your camera to the wall.
Paste installation positioning
stickers on the wall and align
the cross center to the hole in
the wall.
Lead the cables across the hole
on the wall.
1
2
Use a Ø
6-6.5mm drill bit.
Drill 30 mm-depth guide
holes according to the
positions marked by stickers.
1
2