
User`s guide


3 Network Communication
3-12
Using Scopes with the Web Browser
The Web browser interface allows you to visualize data using an interactive
graphical interface.
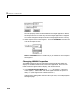
After you connect a Web browser to the target PC you can use the Scopes page
to add, remove and control scopes on the target PC.
1 In the left frame, click the Scopes button.
The Scopes List page is loaded into the right frame.
2 Click the Add Scope button.
A scope of type target is created and displayed on the target PC. The scopes
page displays a list of all the scopes present. The capability exists to add a
new scope, remove existing scopes, and control all aspects of a scope from
this page.
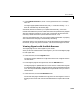
Note If any host scopes exist, they will be visible and controllable from this
page. They may even be removed. However, there is no capability to add any
scopes of type host from the Scope page.
3 Click the Edit button.
The scope editing page opens. From this page, you can edit the properties of
any scope, and control the scope.
4 Click the Add Signals button.
The browser displays an
Add New Signals list.
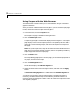
5 Select the check boxes next to the signal names, and then click the Apply
button.
A
Remove Existing Signals list is added above the Add New Signals list.
You do not have to stop a scope to make changes. If stopping the scope is
necessary, the Web interface stops it automatically and then restarts it if
necessary when the changes are made. It will not restart the scope if the state
was originally stopped.