
User`s guide

Create Toolbars
Use the I con Editor
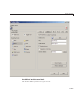
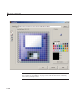
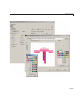
The Icon Editor G UI includes the following components:
• Icon file name —Theiconimagefiletobeloadedforediting
• Import button — Opens a file dialog to select an existing icon file for
editing
• Drawing tools — A group of four tools on the left side for editing icons
- Pencil tool — C olor icon pixels by clicking or dragging
- Eraser tool — Erase pixels to be transparent by clicking or dragging
- Paint bucket tool — Flood regions of same-color pixels with the current
color
- Pick color tool — Click a pixel or color palette swatch to define the
current color
• Icon Edit pane — A n-by-m grid where you color an icon
• Preview pane — A button with a preview of current s tate of the icon
• Color Palette — Swatches of color that the pencil and paint tools can use
• Mo re Colors button — Opens the Colors dialog box for choosing and
defining colors
• OK button — Dismisses the GUI and returns the icon in its current state
• Cancel button — Closes the GUI without returning the icon
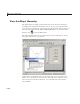
To work with the Icon Editor,
1 Open the Icon Editor for a selected tool’s icon.
2 Using the Pencil tool, color the squares in the grid:
• Click a color cell in the palette.
• That color appears in the Color Palette preview swatch.
• Click in specific squares of the grid to transfer the selected color to
those squares.
6-133