
Specifications

Getting Started Example
1-5
Getting Started Example
This example shows how to create a GUI using GUIDE. It illustrates the
process you should follow when creating your GUI. This process entails:
•Design the GUI – often it is better to design the GUI on paper before
beginning the implementation process.
•Laying out the GUI figure – the GUI figure is the window that contains the
user interface controls, such as push buttons and menus and can also contain
axes for displaying graphs and images.
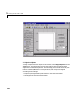
•Program the GUI – the M-file generated by GUIDE displays and controls the
GUI figure you created with GUIDE. It is in this M-file that you program the
callback functions for each user interface control.
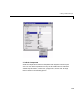
GUIDE’s layout tools enable you to add and arrange components in the GUI
figure. When you activate or save your GUI for the first time, GUIDE generates
the M-file you use to program the GUI.
This example is presented in five sections:
•Designing the GUI – a description of the GUI design
•Laying out the GUI – placing the controls within the Layout Editor
•Programming the GUI – writing the callbacks for the controls
•Laying out the menu – adding the menu to the GUI figure
•Programming the menu callbacks – writing the callbacks for the menus
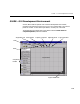
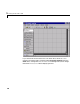
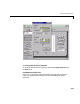
Example – The GUI Design
The GUI used in this example contains one axes that can display either a
surface, mesh, or contour plot of data selected from the popup menu. The
File
menu provides options to print the graphic and to close the GUI.
The following picture shows a sketch similar to what you might use as a
starting point for the design.