
User`s manual


Custom Building MEX-Files
1-29
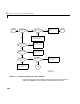
3 Add the .DEF file to the project.
4 Locate the .LIB files for the compiler version you are using under
matlabroot\extern\lib\win32\microsoft. For example, for version 6.0,
these files are in the
msvc60 subdirectory.
5 From this directory, add libmx.lib, libmex.lib, and libmat.lib to the
library modules in the
LINK settings option.
6 Add the MATLAB include directory, MATLAB\EXTERN\INCLUDE to the
include path in the Settings C/C++ Preprocessor option.
7 Add MATLAB_MEX_FILE to the C/C++ Preprocessor option by selecting
Settings from the Build menu, selecting C/C++, and then typing
,
MATLAB_MEX_FILE after the last entry in the Preprocessor definitions
field.
8 To debug the MEX-file using the IDE, put MATLAB.EXE in the Settings
Debug
option as the Executable for debug session.
If you are using a compiler other than the Microsoft Visual C/C++ compiler, the
process for building MEX files is similar to that described above. In step 4,
locate the
.LIB files for the compiler you are using in a subdirectory of
matlabroot\extern\lib\win32
. For example, for version 5.4 of the Borland C/
C++ compiler, look in
matlabroot\extern\lib\win32\borland\bc54.
Using the Add-In for Visual Studio
The MathWorks provides a MATLAB add-in for the Visual Studio
®
development system that lets you work easily within Microsoft Visual C/C++
(MSVC). The MATLAB add-in for Visual Studio greatly simplifies using M-files
in the MSVC environment. The add-in automates the integration of M-files
into Visual C++ projects. It is fully integrated with the MSVC environment.
The add-in for Visual Studio is automatically installed on your system when
you run either
mbuild -setup or mex -setup and select Microsoft Visual C/C++
version 5 or 6. However, there are several steps you must follow in order to use
the add-in:
1 To build MEX-files with the add-in for Visual Studio, run the following
command at the MATLAB command prompt.