
User`s guide
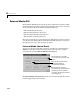

External Mode GUI
4-13
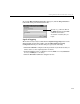
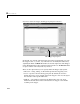
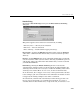
Trigger Signal Selection. You select a trigger signal by choosing it from the Signal
selection list and pressing the
Trigger signal button. A ‘T’ appears to the left
of the block’s name if you have chosen it as a trigger. Note that this setting only
applies when the Trigger source has been set to
signal.
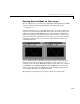
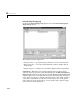
Trigger Options. There are various options available under the Trigger panel
located at the bottom of the
External Signal & Triggering dialog box:
•
Source — manual or signal. Selecting manual directs external mode to start
logging data once the
Arm trigger button on the External Mode Control
Panel
is clicked. Selecting signal tells external mode to start logging data
when the selected trigger signal satisfies the trigger conditions (that is,
crosses the trigger level in the specified direction).
•
Duration — the number of base rate steps for which external mode logs data
after a trigger event. For example, if the fastest rate in the model is 1 second
and a 1 Hz signal is being logged for a duration of 10 seconds, then external
mode will collect 10 samples. If a 2 Hz signal is logged, only 5 samples will
be collected.
•
Mode — normal or one-shot. In normal mode, external mode automatically
rearms the trigger after each trigger event. In one-shot mode, external mode
collects only one buffer of data each time you arm the trigger.
•
Delay — you can specify a delay in your trigger. Delays, expressed in base
rate steps, can be positive or negative and represent the amount of time that
elapses between the trigger occurrences and the start of data collections. A
negative delay corresponds to pretriggering.
•
Arm when connect to target — once your trigger is armed, external mode
monitors the trigger signal for the specified trigger condition. This check box
tells external mode to arm automatically once you’ve connected to the target.