
User`s guide


4 External Mode
4-6
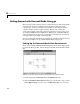
select External Mode Control Panel under the Tools menu. This dialog box
opens.
The top four buttons for use after you have started your real-time program on
your target. The three lower buttons open three separate dialog boxes:
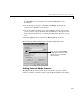
• The
Target Interface button opens the External Target Interface dialog
box, which configures the external mode communications channel.
• The
Signal & triggering button opens the External Signal & Triggering
dialog box, which configures which signals are viewed and how they are
triggered. You must select signals in this dialog box before starting the
real-time program. The term triggering refers to when signals should be
acquired and displayed.
• The
Data archiving button opens the External Data Archiving dialog box.
See “Data Archiving” on page 4-15 for a discussion of this feature.
Target Interface
Before you can run your model in external mode, you must first configure the
target interface and set various triggering and data archiving options. By
default, the
MEX-file for external interface should be set to ext_comm.This
file supports the TCP communications protocol that external mode uses to
communicate between the host and target.
MEX-file arguments can be left
blank.
These three buttons open
three separate dialog
boxes.