
User`s guide
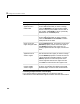
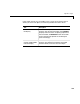

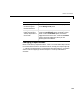
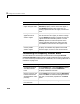
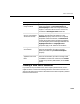
Table Of Contents
- Getting Started
- Using Instrumentation in a Model
- Categories of ActiveX Controls
- Placing ActiveX Controls in a Different Window
- Library Reference
- Index
Knobs & Selectors
3-11
Creating a New Set of Selections
If you want to vary the selections on the Frequency Selector block, then it
might be easier to remove the existing selections and create a new set. This
section illustrates how to create a customized version of the Frequency Selector
block that looks like this:
Change the dial’s
range of motion
On the
Auto panel, check the AutoAngleConfine
check box and then use
AutoStartAngle and
AutoStopAngle to define the range of allowable
angles. To allow the dial to move in a full circle,
uncheck the
AutoAngleConfine check box.
Define a new selection
(that is, new possible
value for the knob)
On the
Selections panel, increase the Selections
property. The ID of the new selection is the
Selections property value minus one. To specify
properties of the new selection, set
SelectionID
to that ID and then set the remaining properties
on the dialog box panel accordingly. Note that the
Highlight Selection and Highlight Color
properties apply to all selections on the block.
Change the text label
of a selection
On the
Selections panel, first set SelectionID to
the ID of the selection you want to change.
Specify the label using the
SelectionCaption
property.
Change the
appearance of a text
label
On the
Selections panel, first set SelectionID to
the ID of the selection you want to change. Then
use
Color to set the color of the text, and FontID
to refer to a previously defined font (on the
Fonts
panel).
Task (Continued) Description (Continued)