
Specifications

Adding Files to a Project
Developing a Simple Program
2-3
2.2 Adding Files to a Project
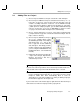
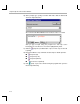
1) Choose Project
→
Add Files to Project. Select hello.c and click Open.
2) Choose Project
→
Add Files to Project. Select Asm Source Files (*.a*, *.s*)
in the Files of type box. Select vectors.asm and click Open. This file
contains assembly instructions needed to set the RESET interrupt
service fetch packets (ISFPs) to branch to the program’s C entry point,
c_int00. (For more complex programs, you can define additional interrupt
vectors in vectors.asm, or you can use DSP/BIOS as shown in section
3.1, page 3-2 to define all the interrupt vectors automatically.)
3) Choose Project
→
Add Files to Project. Select Linker Command File
(*.cmd) in the Files of type box. Select hello.cmd and click Open. This file
maps sections to memory.
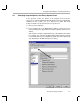
4) Choose Project
→
Add Files to Project.
Go to the compiler library folder
(C:\ti\c6000\cgtools\lib). Select Object
and Library Files (*.o*, *.lib) in the
Files of type box. Select rts6201.lib
and click Open. This library provides
run-time support for the target DSP.(If
you are using the TMS320C6701 and
floating point values, select rts6701.lib
instead.)
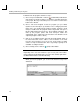
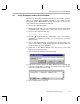
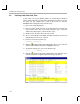
5) Expand the Project list by clicking the
+ signs next to Project, myhello.mak,
Libraries, and Source. This list is
called the Project View.
Note: Opening Project View
If you do not see the Project View, choose View
→
Project. Click the File icon
at the bottom of the Project View if the Bookmarks icon is selected.
6) Notice that include files do not yet appear in your Project View. You do not
need to manually add include files to your project, because Code
Composer Studio finds them automatically when it scans for
dependencies as part of the build process. After you build your project,
the include files appear in the Project View.
If you need to remove a file from the project, right click on the file in the Project
View and choose Remove from project in the pop-up menu.