
Specifications


Creating a New Project
2-2
2.1 Creating a New Project
In this chapter, you create a project with Code Composer Studio and add
source code files and libraries to the project. Your project uses standard C
library functions to display a hello world message.
1) If you installed Code Composer Studio in c:\ti, create a folder called
hello1 in the c:\ti\myprojects folder. (If you installed elsewhere, create a
folder within the myprojects folder in the location where you installed.)
2) Copy all files from the c:\ti\c6000\tutorial\hello1 folder to this new folder.
3) From the Windows Start menu, choose Programs
→
Code Composer
Studio ’C6000
→
CCStudio. (Or, double-click the Code Composer Studio
icon on your desktop.)
Note: Code Composer Studio Setup
If you get an error message the first time you try to start Code Composer
Studio, make sure you ran Code Composer Setup after installing Code
Composer Studio. If you have a target board other than the ones mentioned
in the instructions provided with the CD-ROM, see the documentation
provided with your target board for the correct I/O port address.
4) Choose the Project
→
New menu item.
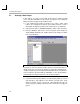
5) In the Save New Project As window, select the working folder you created
and click Open. Type myhello as the filename and click Save. Code
Composer Studio creates a project file called myhello.mak. This file
stores your project settings and references the various files used by your
project.