
Product Manual


EasyCharge 1.1 and 4.3A – User Manual
7
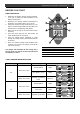
3 Determine which pole of the battery is grounded
to the vehicle chassis. In most cases this will be
the negative pole.
a. Negative-grounded: connect the POSITIVE
(RED) lead to the POSITIVE (+) pole of the
battery. Then connect the NEGATIVE
(BLACK) lead to the vehicle chassis, away
from the battery and fuel lines.
b. Positive-grounded: connect the NEGATIVE
(BLACK) lead to the NEGATIVE (–) pole of
the battery. Then connect the POSITIVE
(RED) lead to the vehicle chassis, away from
the battery and fuel lines.
4 Insert the mains plug into the wall socket. After a
five second delay the charger starts to charge.
The charge status LEDs will indicate the battery
charge level.
5 When the 100% LED is illuminated the charge is
complete. Disconnect the mains plug from the
wall socket first.
6 Remove the connection from the vehicle chassis
and then remove the connection from the battery
pole.
MAINTENANCE
Examine your electrical installation on a regular base,
at least once a year. Defects such as loose
connections, burnt wiring etc. must be corrected
immediately.
If necessary, use a soft clean cloth to clean
enclosure of the battery charger. Do not use any
liquids or corrosive substances, such as solvents,
alcohol, petrol or abrasive components.
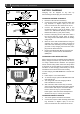
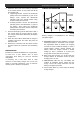
THEORY OF OPERATION
Battery charging is accomplished in the following
automatic stages:
A. REGENERATION (LED 25% flashing): If a deeply
discharged battery is connected to the charger,
the regeneration mode is started. Low charging
currents are used to allow the battery to reach a
normal battery voltage, without harming the
battery. When the charger reaches a normal
voltage (or after a maximum of 6 hours) the
charger will continue with the next stages.
B. BULK (LED 25% till 50% on): At this stage the
charger delivers its maximum current for quick
charging from 0 to 75%.
C. ABSORPTION (LED 75% on): The battery has
reached its maximum charge voltage and the
charge current will slowly decrease until the
battery is charged up to 100%.
D. FLOAT (LED 100% on): At this stage the battery
is fully charged.
VOLTAGE
TIME
CURRENT
A
B
C
D